Goat Cheese Tortilla Casserole
I’ve been watching a lot of Beat Bobby Flay lately. It’s might be a little unhealthy. This is the premise of the show: Two professional chefs compete against each other for a chance to compete against Bobby. Two supposed friends of Bobby’s choose the winner of that matchup, and then the winning chef announces a signature dish that they and Bobby Flay will each make in a head-to-head competition. And then Bobby wins. The end.

I’ve been watching a lot of Beat Bobby Flay lately. It’s might be a little unhealthy. This is the premise of the show: Two professional chefs compete against each other for a chance to compete against Bobby. Two supposed friends of Bobby’s choose the winner of that matchup, and then the winning chef announces a signature dish that they and Bobby Flay will each make in a head-to-head competition. And then Bobby wins. The end.
The winning chef knows ahead of time what they’re going to be making and, one must assume, have selected something they make really well and probably practiced a lot. And then Bobby has to make it, whatever it is, on the fly - admittedly, in a kitchen he knows well, in a setting and under time pressure that he’s really familiar with. But still. Sometimes it’s something like enchiladas, and then you’re yelling at the screen, why why why would you choose something in his wheelhouse? You think you can beat him at his own game? Did you even watch the show before you signed up??? And then sometimes it’s something like goulash or spätzle and you think, absolutely no way he’ll win - and then he does. (I saw through an unreliable source that Bobby only has a 65% winning record over 18 seasons, but the only explanation I have for this is that he must have gotten better over time and his winning rate is much, much higher in recent seasons.)
If you don’t know the show, you should probably stop reading this and go watch it right now. I can wait.


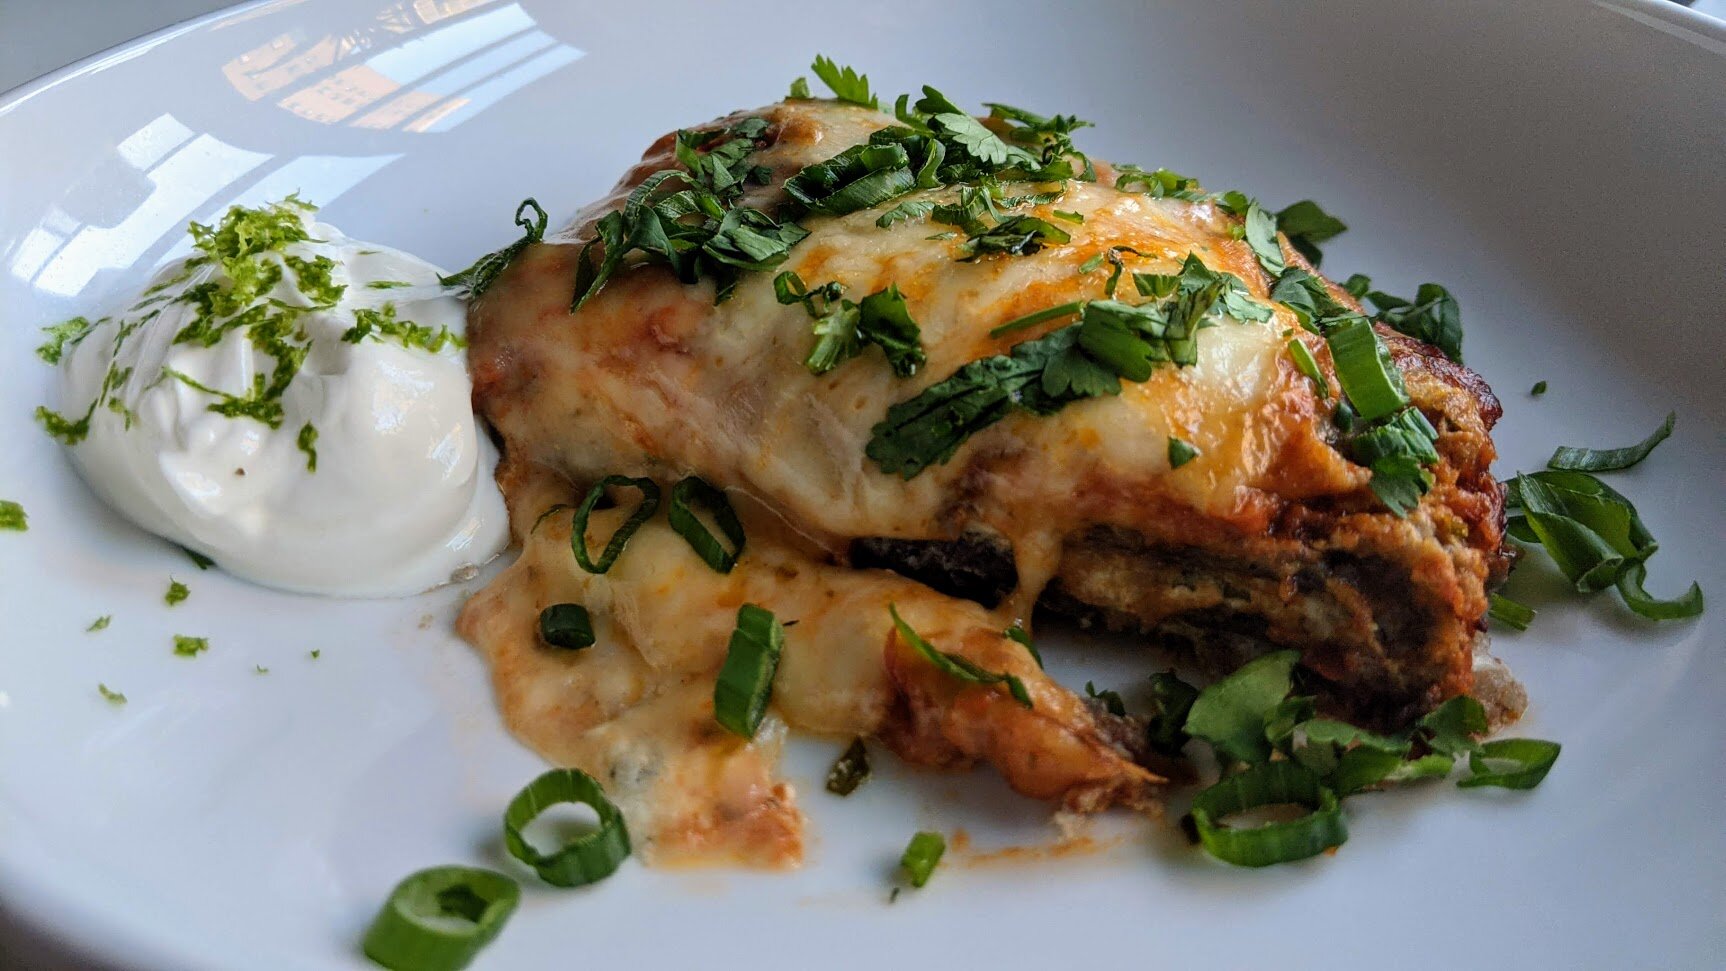
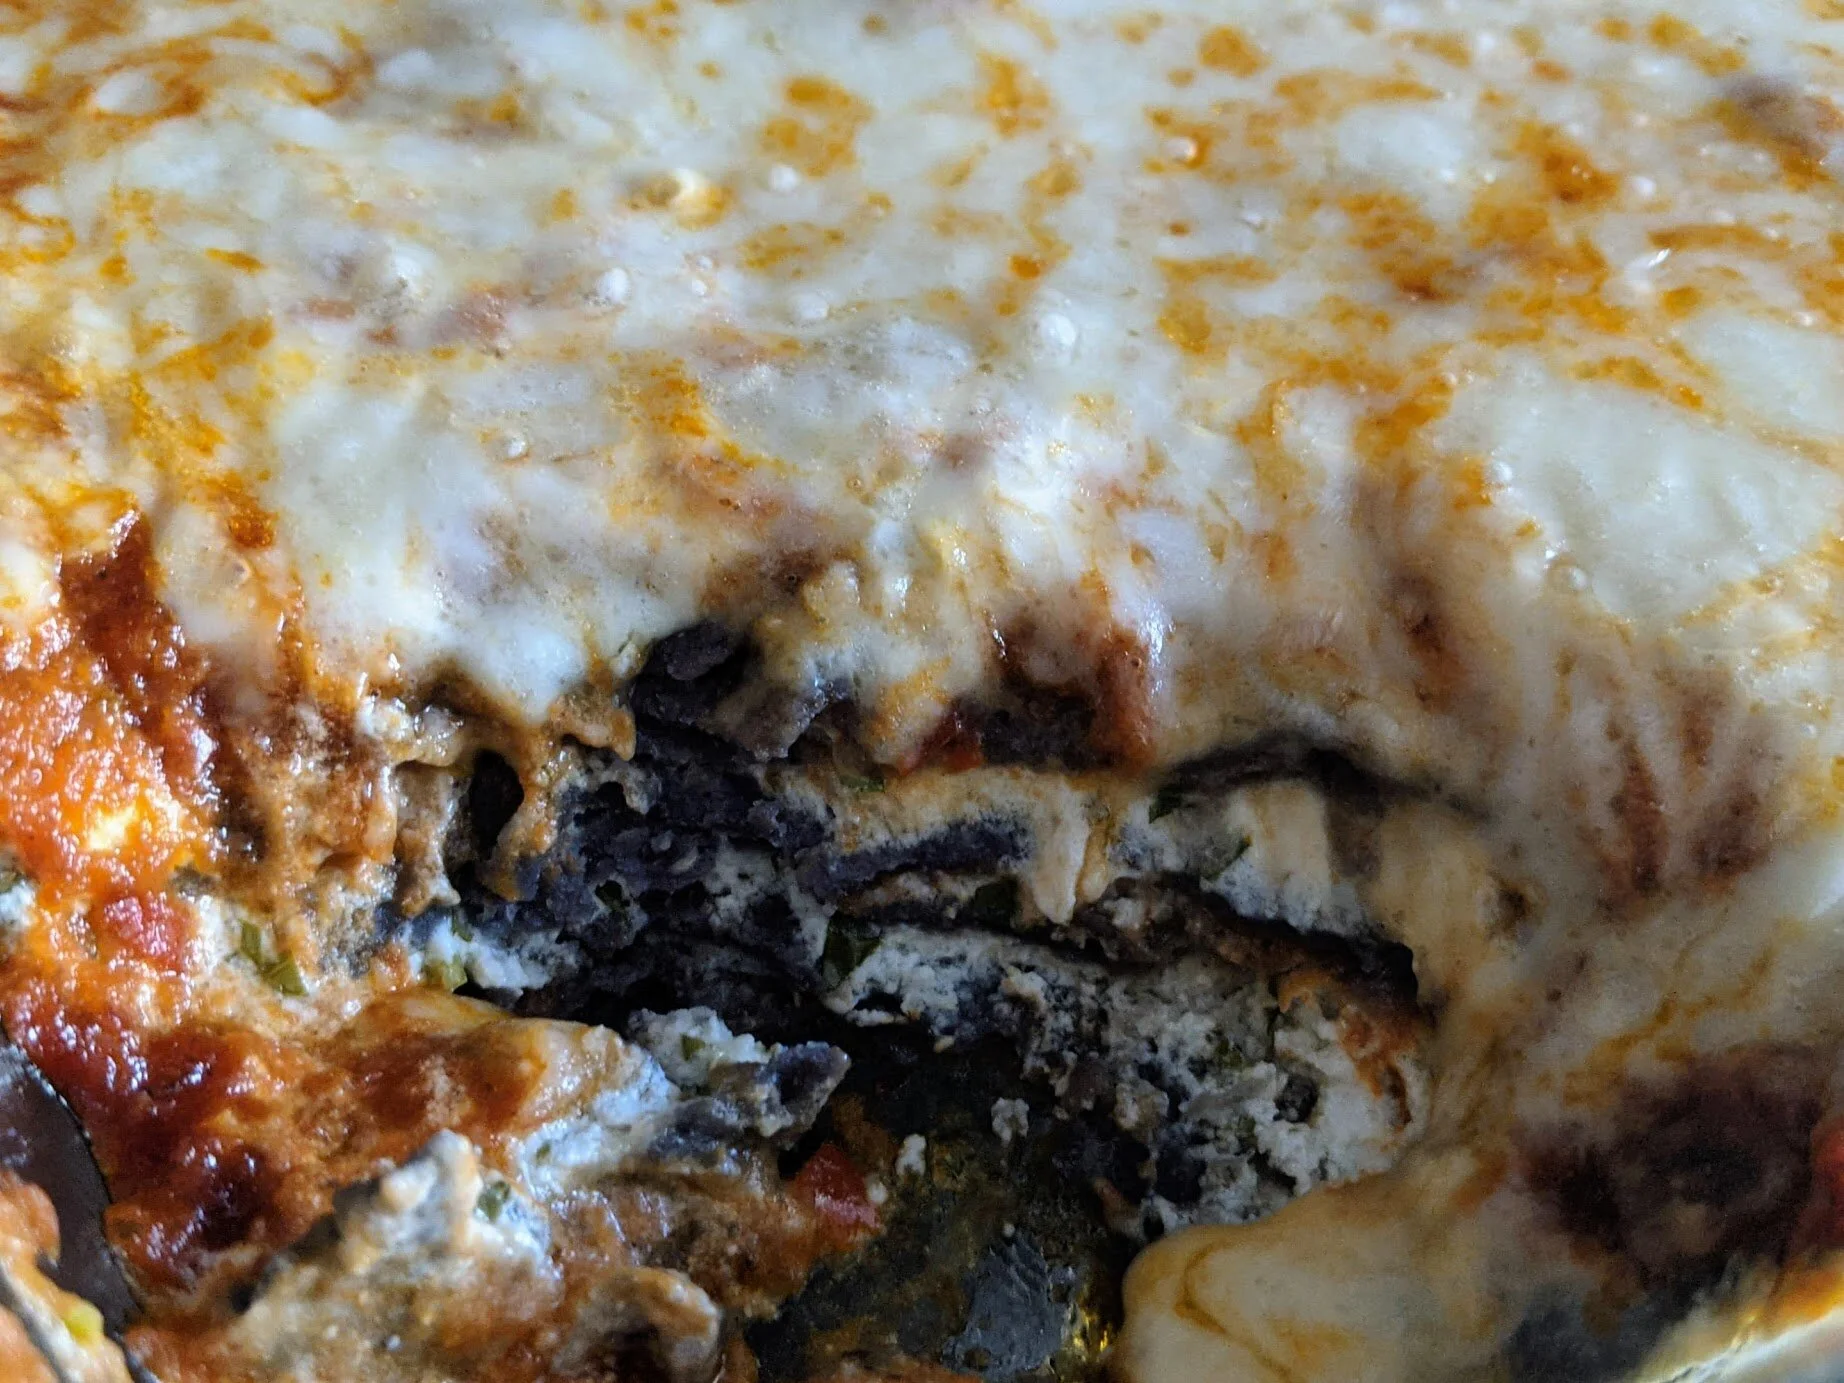
So, for no particular reason, I was looking into Bobby Flay’s recipes and am happy to share this goat cheese-enchiladas-turned-casserole. I know goat cheese enchiladas sound strange, but if you like cheese (I do) and if you’re okay with this being pretty rich (I am), then you’re going to like this recipe. The goat cheese is spiked with lime juice and garlic and blended until light and fluffy, then folded with spices and herbs. That goat cheese delight is stacked with blue corn tortillas in a casserole dish, smothered in a homemade tomato-chile sauce, and tucked into a cozy blanket of Monterey jack cheese. (I did warn you that it’s rich.)


This dish is a bit of an effort - there are two components to make before you assemble the casserole - but it’s worth it for the ooey gooey cheesy outcome. Rice and beans are highly recommended as a side, as is a green salad with a bright dressing to cut the richness.
Goat Cheese Tortilla Casserole
Time: 1.5 hours + 30 mins inactive || Servings: 4-6 || Source: Adapted from Bobby Flay
For the chile sauce:
Ancho chiles - 3
Vegetable oil - 3 tbsp
Red onion - 1 large, finely chopped
Garlic cloves - 3, chopped
Cumin - 1 tbsp
Mexican oregano or regular oregano - 1 tbsp
White wine - 1 cup
Canned tomatoes - 2 cans, 28 oz
Chicken or vegetable stock - 3 cups
Honey - 1-2 tbsp
For the filling:
Soft goat cheese - 1 1/4 lb
Garlic - 3 cloves, coarsely chopped
Cotija cheese - 1/4c, grated
Lime juice - 2 tbsp, more to taste
Cilantro leaves - 1/4c, finely chopped
For assembly:
Blue corn tortillas - 12
Monterey jack - 8 oz, grated
Cilantro - 3 tbsp, chopped
Sour cream, for garnish (mix with lime zest if you’re feeling fancy)
Scallions, sliced thinly, for garnish
Limes, for garnish
Make the chile sauce.
In a small saucepan, bring 2 cups of water to a boil. When boiling, remove from heat and add chiles. Let sit for 30 minutes (longer is okay, if needed). Remove the stems and seeds from the chiles, then place them in a food processor or blender with 1/4 cup of the soaking liquid. Puree until smooth.
In a medium skillet, heat vegetable oil over medium-high. Add onion and cook until soft, 5-7 minutes. Add garlic and cook for another minute, until fragrant. Lower heat if necessary to prevent it from burning. Add cumin and oregano and cook for another minute, until fragrant. Add the ancho puree and cook for another 3 minutes. Add wine, canned tomatoes, and stock to the pan. Raise the heat to bring to a boil and then reduce to a simmer. Allow to simmer for 30 minutes, until slightly thickened. Add salt and pepper, then taste. Add more seasoning as necessary, as well as honey, until you’re satisfied with the flavor.
You can leave the sauce as is if you like it chunky, or puree in a food processor, blender, or with an immersion blender for a smoother texture.
Make the filling.
Place the goat cheese, garlic, cotija cheese, and lime juice in a food processor or blender. Process until smooth and fluffy; this may take a few minutes. Season with salt and pepper, and fold in the chopped cilantro. Taste and adjust seasoning.
Assemble the casserole.
Heat the oven to 375°F.
Spread 1/2 cup or so of the chile sauce on the bottom of a casserole dish. Place three tortillas in the pan, slightly overlapping. You may want to cut the tortillas to get more pan coverage, but this isn’t strictly necessary. Spread 1/2 cup of the sauce over the tortillas, then spread the goat cheese. Top with two more layers, repeating tortillas, sauce, and cheese. Top with a final layer of tortillas, another generous layer of sauce, and the Monterey jack cheese.
Bake for 20 to 30 minutes, until the enchiladas are heated through and the cheese is melted. Remove from the oven. Serve sprinkled with cilantro and scallions, a dollop of sour cream, and a lime wedge.

Roasted Chicken Legs and Cauliflower with Yogurt
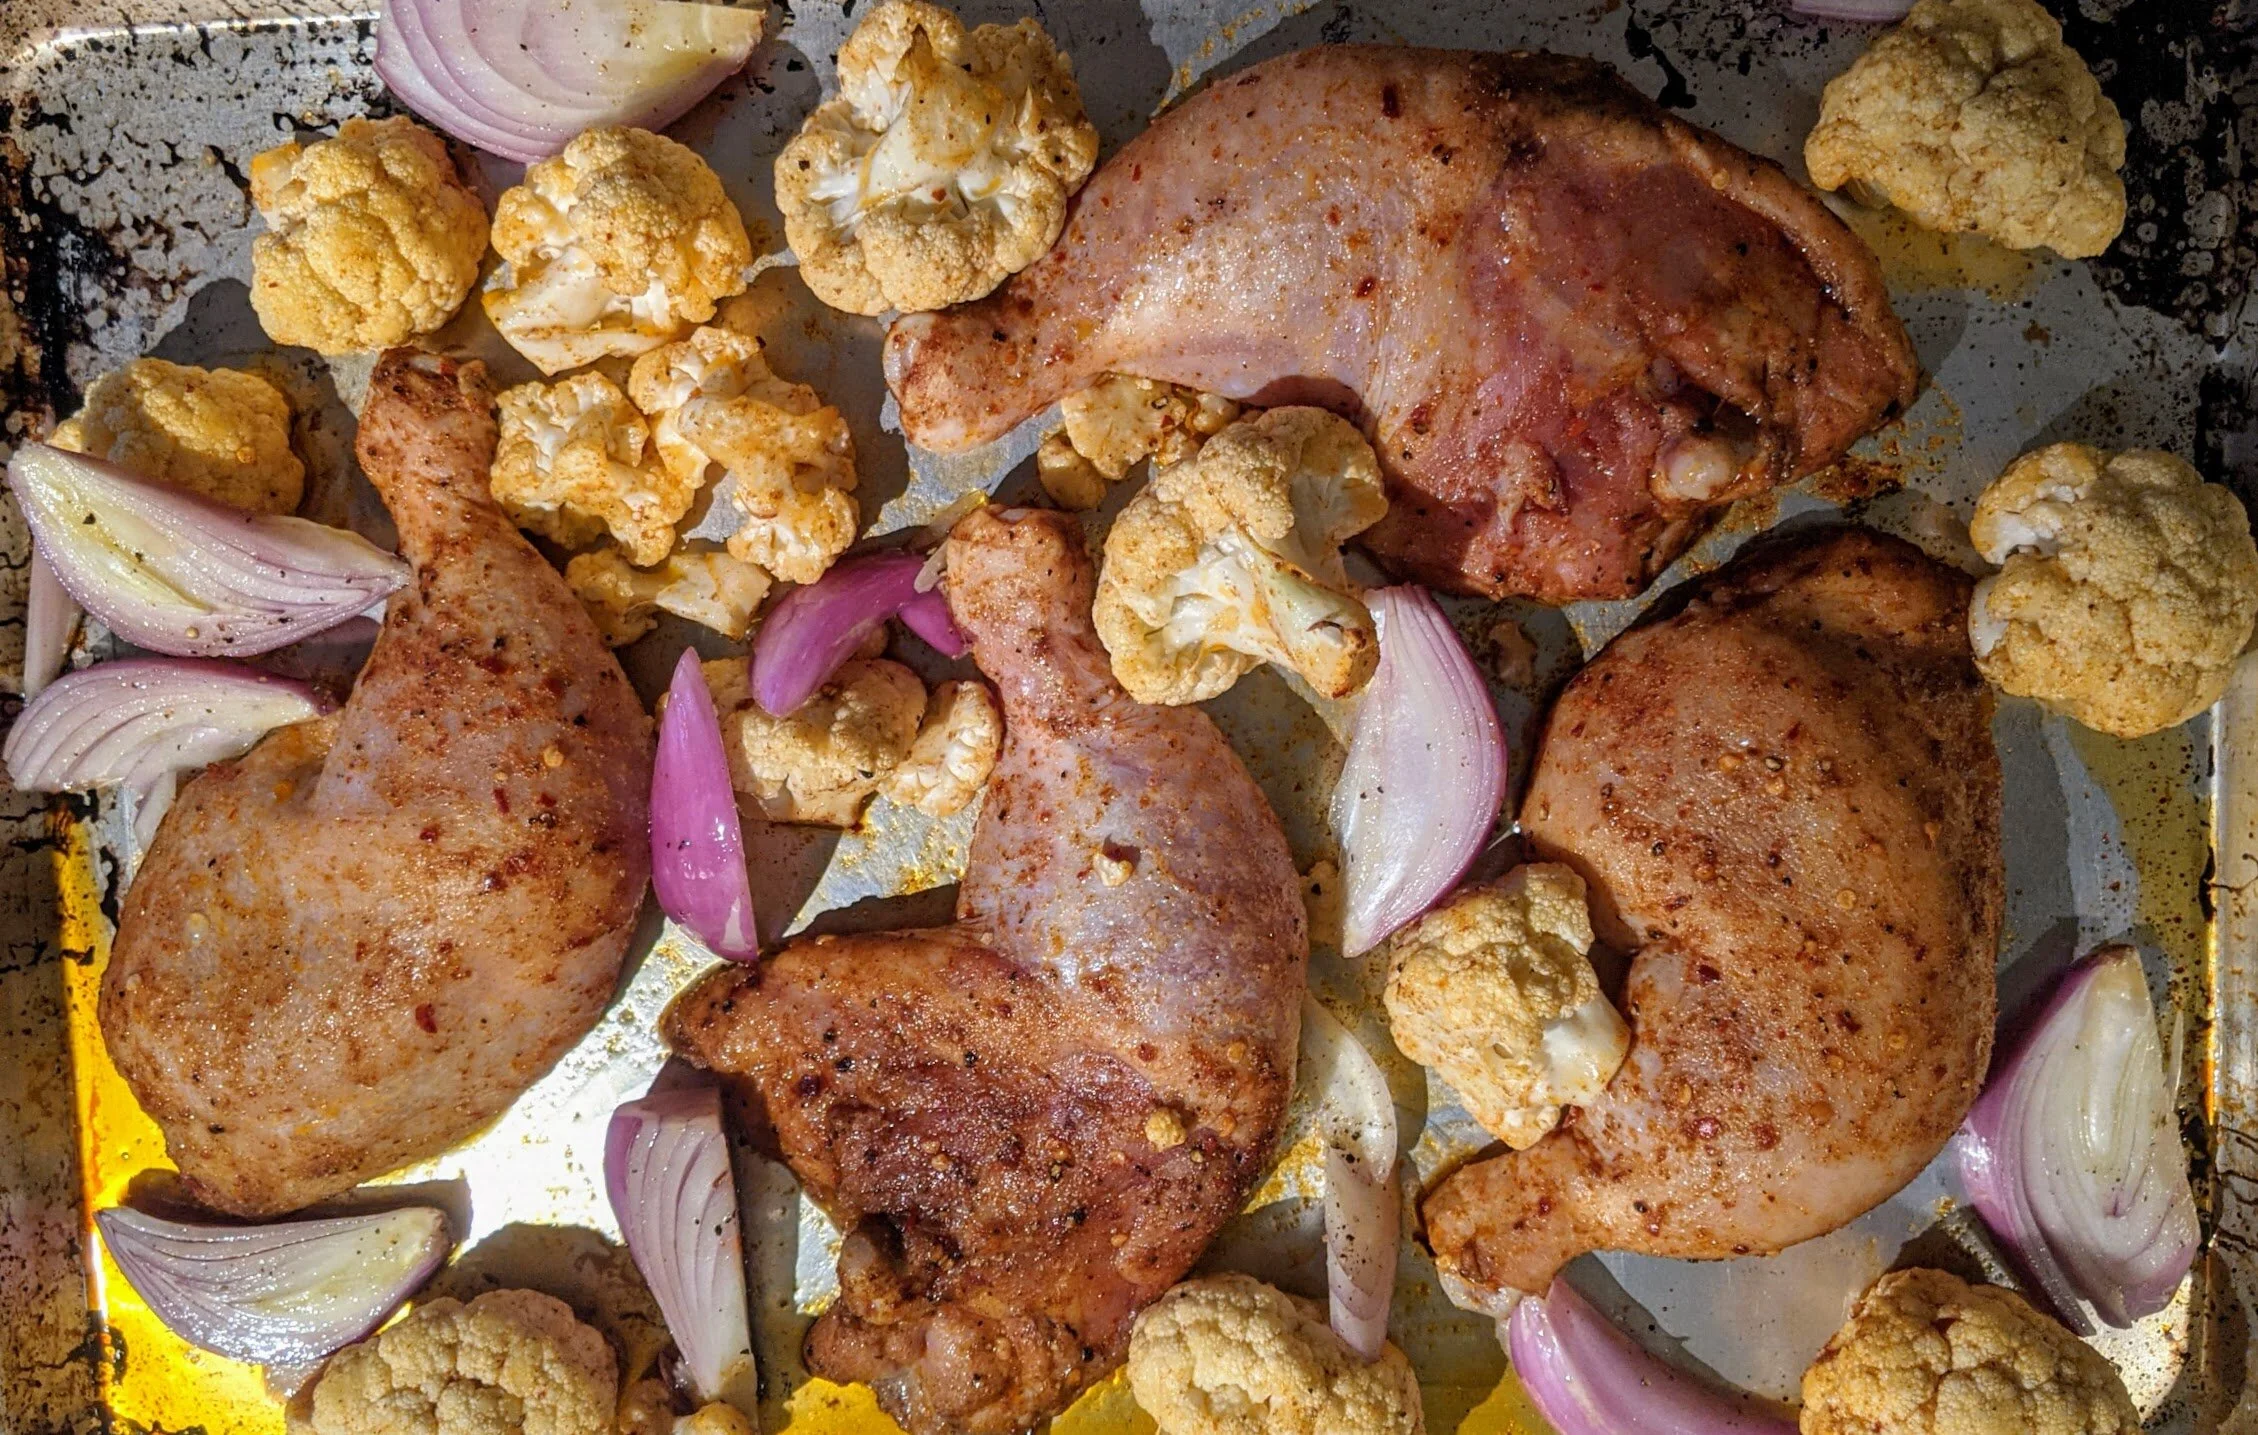
This is a really simple weeknight dinner type of dish - but I wouldn’t have any qualms about serving this for guests. Coat chicken, cauliflower, and some quartered shallots in a warm spice mix and put it in the oven - 40 minutes later, you have dinner! An herby greek yogurt with bright lemon and garlic cuts the heat and adds a tangy contrast.

This is a really simple weeknight dinner type of dish - but I wouldn’t have any qualms about serving this to guests. Coat chicken, cauliflower, and some quartered shallots in a warm spice mix and put it in the oven - 40 minutes later, you have dinner! An herby greek yogurt with bright lemon and garlic cuts the heat and adds a tangy contrast.
The chicken here is marinated in a spicy rub as much as a day ahead, if possible, or even just an hour. If you don’t have the forethought to do it earlier, just rub it on and under the skin for maximum flavor when you’re ready to cook. The dregs of the marinade coat the cauliflower and shallots, continuing our simplicity theme. Cauliflower is a nice vehicle for the spices, but you could substitute broccoli or maybe even zucchini in the summer.


I found this quite filling on its own, but if you want to round it out, feel free to double the marinade and toss some potatoes (fingerlings, chopped yellow potatoes, chopped sweet potato) in with the rest of the vegetables. Rice (maybe mixed with some parsley and lemon zest) would be another great option to bulk this out.
Roasted Chicken Legs and Cauliflower with Yogurt
Time: 1 hour || Servings: 4 || Source: Adapted from Yossy Arefi at NYT
Coriander, ground - 1 tsp
Smoked paprika - 1 tsp
Red pepper flakes - 1/2 tsp
Olive oil - 3 tbsp
Chicken legs, bone-in, skin-on - 4
Cauliflower - 1 small head, about 1 1/2 lb
Shallots - 3
Greek yogurt - 1 cup
Mint - 2 tbsp, chopped
Cilantro - 2 tbsp, chopped
Lemon juice, freshly squeezed - 2 tbsp
Garlic clove - 1
Up to a day before you plan to cook, marinate the chicken. In a container with a cover large enough to hold the chicken (or a gallon bag), combine 1 tbsp of olive oil with the coriander, smoked paprika, and red pepper flakes. Add a generous pinch of salt and several grinds of pepper. Add chicken and coat it well in the marinade. If you’re using a gallon bag, push the air out of the bag and seal, and then vigorously rub the chicken to coat it. Refrigerate chicken until you’re ready to cook.
Note: If you don’t get this done the day before, you can rub the marinade on and under the skin to help the flavors soak in - in any case, it’ll still taste great.
When you’re ready to cook, heat the oven to 425°F. Peel the shallots and cut into quarters. Separate the cauliflower into florets no bigger than 2 inches.
Take the chicken out of the marinade and place on a sheet pan. Add another 2 tbsp of olive oil to the container that held the chicken. Toss the cauliflower and shallots in the olive oil, adding a pinch each of salt and pepper, then distribute onto the sheet pan around the chicken.
Place pan in the oven and roast for 40 minutes. Check about halfway through and give the vegetables a stir. The chicken is done when it’s browned and cooked through (165°F). This might be a little before the time is up - if that’s the case, pull the chicken out and cover to keep warm, and let the vegetables continue to roast until tender.
Make the yogurt sauce - this could be done ahead in the day, or while the chicken’s cooking. Whisk together the yogurt, mint, cilantro, and grated garlic. Add lemon juice, a pinch of salt and pepper, then taste and adjust.
Serve topped with juices from the sheet pan, a squeeze of lemon, a few cilantro leaves, and a large dollop of yogurt sauce.

Chinese-Style Rice Noodles
My best friend since childhood, Cat, is Chinese. We had sleepovers weekly, attended our first concert together, went to dance classes together (…when my mom didn’t take us for ice cream instead - the antithesis of Cat’s strict Chinese parents). We grew up in each other’s homes during our formative years.
My best friend since childhood, Cat, is Chinese. We had sleepovers weekly, attended our first concert together, went to dance classes together (…when my mom didn’t take us for ice cream instead - the antithesis of Cat’s strict Chinese parents). We grew up in each other’s homes during our formative years.
My family introduced Cat to American, Middle Eastern, and European cuisines. She had her first hamburger at my house and most of the candy she consumed from elementary school through junior high. In an almost certainly overblown-in-the-retelling near drowning incident at a water park, my mom frantically yelled, “That’s my daughter!!!” at a confused lifeguard. (Interracial adoption was less prevalent in NH in the ‘90s, no doubt.)
On the reverse side, I spent a ton of time at Cat’s house. Hanging out with Cat included watching her practice piano, attending Chinese school as the awkward Caucasian tag-along, and going apple picking with her extended family. Her family still loves telling stories about the first time I used chopsticks (it didn’t go well), my reaction to chicken feet (it didn’t go well), and how I worked the room with all the non-English speaking relatives (it went really well, they loved me).


I had no idea how lucky I was to be exposed to Cat’s mother’s amazing culinary skills over the years. Even now, I remember what their home smelled like, the rice always in the pot, the balls of herbal medicine. All those years, and I have maybe three poorly pronounced words of Chinese and no recipes or instincts for Chinese food. For better or worse, all I have to go on now is Cat.
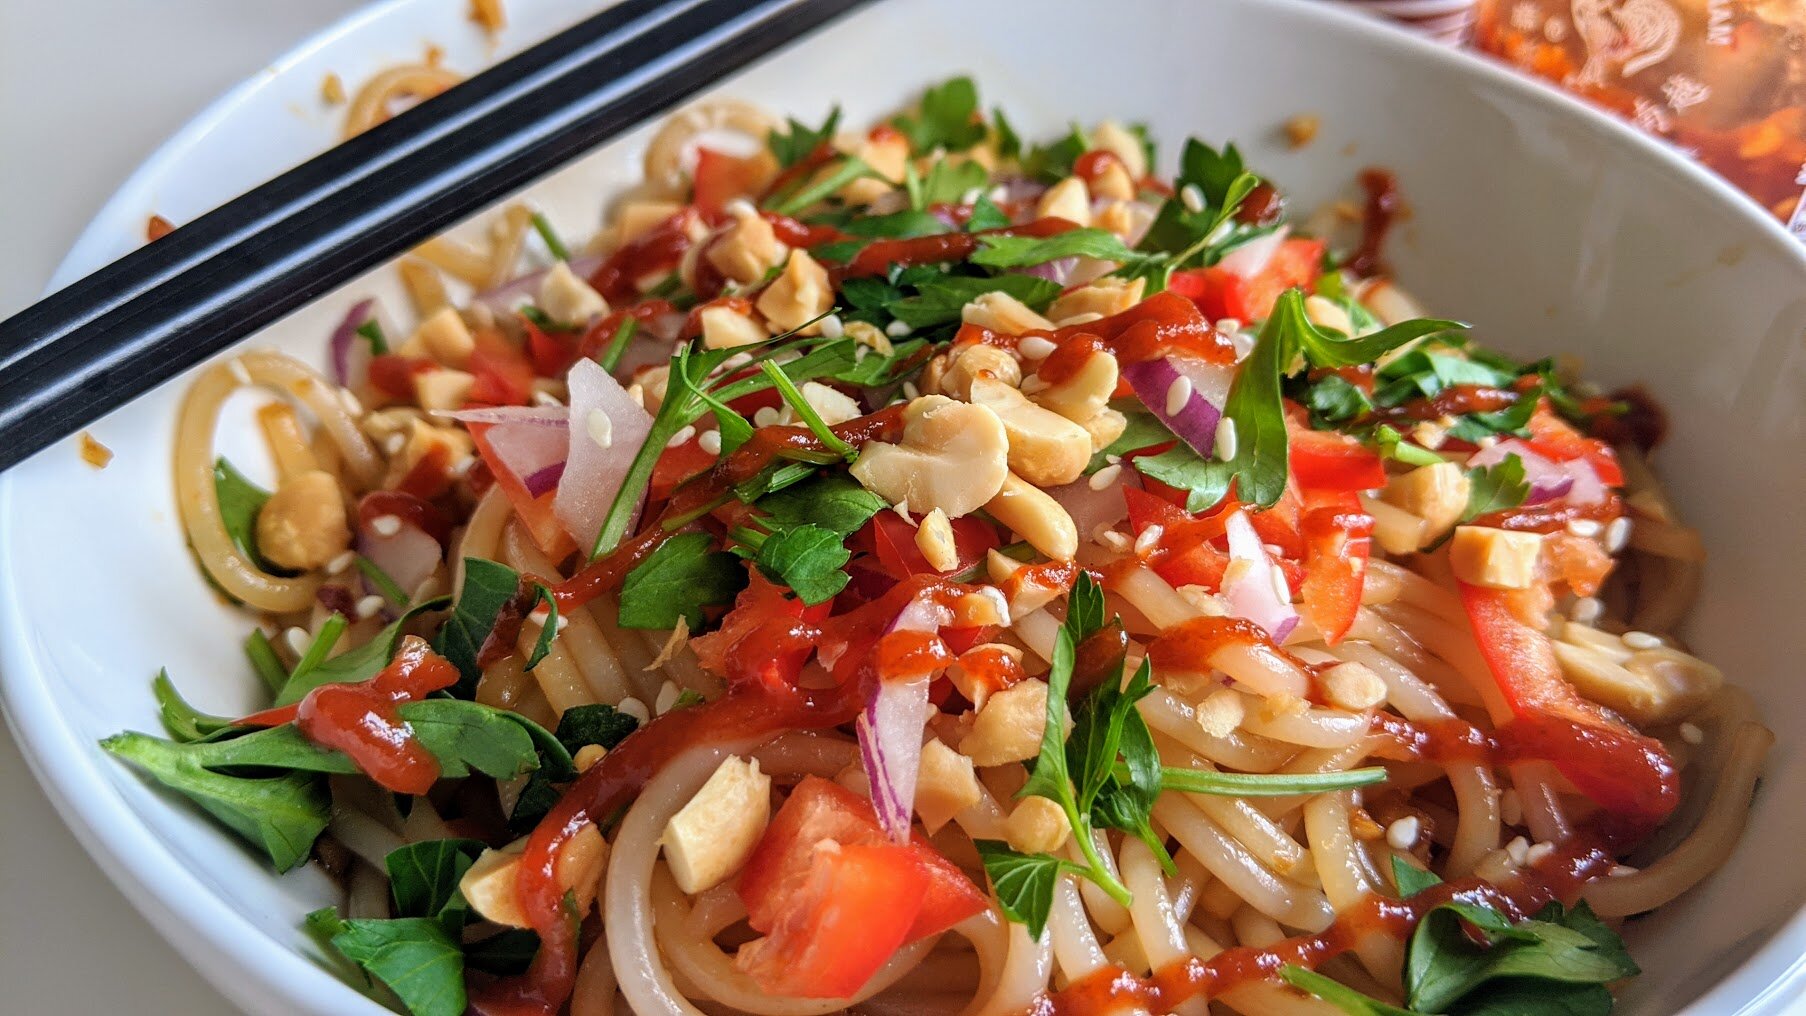
While I can’t really say whether this is authentically Chinese (I was ten, I wasn’t paying attention!), this noodle dish is based off of Cat’s “recipe” when she made it for me a couple of years ago. Measurements weren’t really involved, and she thought it was silly that I was even asking - “just taste it, does it taste good?” - so let’s just say this is a rough reimagining of what she did.


This has been a go-to recipe in my household for a quick and easy, mostly healthy, warm lunch. This is a very basic version of it, but it’s easily adapted to include vegetables (wilted greens, raw radishes, hot peppers) and meat or seafood. In what’s developing as a bit of a theme on this blog, I find this to be yet another good recipe for using up odds and ends in the kitchen.
Chinese-Style Rice Noodles
Yield: 2 servings || Time: 20 minutes || Source: Cat
Rice noodles - 4 oz
Ginger - 2 inches, grated or minced
Garlic - 1 clove, grated or minced
Soy sauce - 1/3 cup
Rice wine vinegar - 1 tbsp
Sesame oil - 1 tbsp
Chili garlic sauce - 1 tbsp or to taste (if you don’t have this, add some red pepper flakes to taste)
Red onion - 1/4 cup, chopped
Red pepper - 1/3 cup, chopped
Cilantro - 2 tbsp, chopped
Peanuts - 2 tbsp, chopped
Sesame seeds, for garnish
Sriracha or other hot sauce, for serving
Set a large pot of water to boil. When it’s boiling, cook noodles according to package directions. This usually takes 30 seconds if they’re fresh noodles and maybe 3 minutes if they’re dry.
In a small bowl, combine ginger, garlic, soy sauce, rice wine vinegar, sesame oil, and chili garlic sauce or red pepper flakes. Taste - it should be salty from the soy sauce and a little vinegary. Adjust to taste, but remember it’ll be absorbed by starchy noodles so it won’t taste as strongly when everything is combined.
When noodles are ready, drain and pour them into bowls. Divide sauce among bowls and toss the noodles. Top with chopped onion, red pepper, cilantro, and peanuts. Garnish with sesame seeds and serve with Sriracha.

Corn Jalapeño Muffins
Buying a farm share has so many benefits: we support local food, a local business, local people, plus we eat healthfully and deliciously ourselves. But the downside is that you get a LOT of whatever’s in season and growing well at the farm. Which, in this case, means lots and lots of corn.

I’m going to blow your mind in a couple days with a killer catfish recipe. But first I have to talk about corn.
I have so much corn.
Buying a farm share has so many benefits: we support local food, a local business, local people, plus we eat healthfully and deliciously ourselves. But the downside is that you get a LOT of whatever’s in season and growing well at the farm. Which, in this case, means lots and lots of corn.
I’m getting into the farm share rhythm and slowly but steadily learning how to put away those summer flavors for the darker and sparser wintertimes. (Yes, winter is coming.) I made some delicious, bright plum tomato sauce that will just scream summer when I rediscover it in my freezer in January. And instead of wondering what to do with another amazing, fragrant bunch of basil, I made a quick and dirty pesto that has been my go to snack with bread all week.
I have to admit, though, that I am having an absolute drought of creativity when it comes to corn. I know I can cut the kernels off the cob and freeze them straight, but that seems a little pathetic, and what will I do with it this winter anyway?
So I turned to my local newspaper and I found a recipe for corn jalapeno muffins and I can’t lie, I was pretty excited. I like spicy food, but my partner LOVES spicy food. And anything that will mercifully take two whole cobs of corn off my hands is very much in my wheelhouse right now.


I made a few modifications to this recipe to turn it into the corn-using muffins of my dreams. I reduced the butter by a couple of tablespoons, which allowed me to add butter directly to the cooked muffin with limited guilt. (I also melted it in the same pan as the corn jalapeño mixture, because… why?) I doubled the jalapeño because - as mentioned - the partner loves spice. I made a full muffin style version of these, rather than the mini-muffins the recipe suggests. And, of course, I added a little more corn that was strictly necessary.
The batter ended up so light and airy that I felt like I should fold the corn, jalapeño, and cheese into it rather than mix - but this sort of delicacy is unnecessary. Give it a try -- you too will end up with muffins that are moist and spicy with pops of texture from the sweet corn kernels.
Corn Jalapeno Muffins
Yield: 18 muffins || Time: 45 minutes || Adapted from: The New York Times
Butter - 4 tbsp
Corn kernels - raw from a fresh corn cob, or chopped frozen corn
Jalapeño - 2
Flour - 1 cup
Cornmeal - 1 cup
Baking powder - 1.5 tsp
Baking soda - 1.5 tsp
Eggs - 2, beaten
Buttermilk - 1.5 cups
Sharp cheddar or gruyere cheese - 3 ounces or 85 grams
Heat the oven to 400°F and butter a muffin tin.
In a small skillet, heat butter over medium low heat. Add corn and jalapeño, season lightly with salt and pepper, and sauté for a couple of minutes to soften.
In a medium bowl, whisk together flour, cornmeal, baking powder, and baking soda. Add eggs and buttermilk and mix. Add corn jalapeño mixture, followed by the cheese.
Fill muffin tin with batter until about 3/4 full. Bake for 15-20 minutes or until a tester comes out clean.