
French Onion Soup
French onion soup is so simple, so inexpensive, and so classic. The sweet onions, gooey cheese, and soaked bread is so comforting, eating it is like getting a warm hug from the inside. Slicing the onions for this dish is a bit of a chore - but it’s French onion soup, so I guess you expected to slice onions? And caramelizing them to achieve the deep, nutty brown sweetness of your onion soup dreams takes time, but largely unattended time. Your patience will be well rewarded.

French onion soup is so simple, so inexpensive, and so classic. The sweet onions, gooey cheese, and soaked bread is so comforting, eating it is like getting a warm hug from the inside. Slicing the onions for this dish is a bit of a chore - but it’s French onion soup, so I guess you expected to slice onions? And caramelizing them to achieve the deep, nutty brown sweetness of your onion soup dreams takes time, but largely unattended time. Your patience will be well rewarded.


I pulled this recipe from The Food Lab by J. Kenji López-Alt, a heavy tome of a book detailing everything from how to make canned beans taste good to how to make perfectly crispy roasted potatoes (outlining several trials leading to success). If you like understanding the science behind cooking, I highly recommend - this is a book for geeks who like to eat good food. Mr. López-Alt explains that your onion eating needs are best served by slicing onions from tip-to-tip (or, if you want to think of your onion as a globe, from pole-to-pole). So that’s what we do here, for 5 pounds or 7 cups of onions. I suggest that step one is sharpening your knife (or grabbing your mandoline).
Once sliced, this abundance of onions goes into a dutch oven with some butter and salt to sweat out over very low heat for 2 hours. Over this time, the onions collapse down to a more reasonable amount, surrounded by their sugary juices. The heat goes up, the water evaporates, and the onions turn sweet and deeply browned. Simmer with some fresh herbs, sherry, and chicken stock, and your soup base is done. A chunky slice of baguette, a healthy dose of shredded cheese (metaphorically speaking), and trip to the broiler officially make this French onion soup.


Make sure to use broiler-proof bowls for this - crocks or ramekins or whatnot. In a pinch, you could cover a sheet pan with some foil, broil the cheese directly onto the bread, and then add it to your soup. But then you’d probably want to make sure the soup is piping hot and add some additional cheese to melt into it… because, you know, cheese.
French Onion Soup
Time: 3 hours || Servings: 4 || Source: The Food Lab
Yellow onions - 5 lbs, about 7 cups, thinly sliced pole to pole
Butter, unsalted - 4 tbsp
Salt - 1 tsp
Sherry - ¼ cup
Chicken stock - 6 cups
Bay leaves - 2, fresh or dried
Thyme - 6 sprigs fresh, or 1 tsp dried
Gruyere or Swiss cheese - 8 oz, about 2 cups grated
Baguette - sliced 1/2 inch thick, either a day old or toasted
Use a large Dutch oven or other heavy bottomed pot with a tight fitting lid. Place pot over medium heat and melt butter. Add onions and the salt. The pot will be full of onions - it will seem ridiculous, but it will cook down to a reasonable amount over time. Cook for about 5 minutes, stirring now and then with a wooden spoon, until the onions have begun to soften and wilt a bit. Cover the pot with the lid (if it’s not tight fitting, cover with aluminum foil and then the lid) and reduce to the lowest heat possible. Cook for 2 hours, giving the onions a stir every 45 minutes or so, until the onions are completely tender.
Remove the lid and foil, if using, and increase the heat to medium-high. The onions will have released a lot of water. Cook for about 15 minutes, stirring frequently, until the liquid has evaporated and you see a brown crust starting to form on the bottom of the pot. This is the start of your caramelization! Deglaze the pan by adding 2 tbsp of water and scrape up the brown crust with a wooden spoon. Distribute the onions evenly over the bottom of the pot, then let it cook for another 5 minutes, undisturbed, until the brown crust develops again. Repeat this pattern of deglazing and undisturbed cooking until the onions become a deep golden brown and taste sweet and delicious. This might take 4 or 5 total cycles.
Once your onions reach the desired color, add the sherry, chicken stock, bay leaves, and thyme to the pot. Bring the liquid to a boil, then reduce to a simmer. Simmer, uncovered, for 15 minutes. The stock will reduce slightly and turn dark. Taste and season with salt and pepper. Discard the bay leaves and the thyme sprigs, if using.
Heat the broiler. Place four broiler-proof bowls on a baking sheet (I used large ramekins). Distribute soup among bowls, top with a slice of baguette and the shredded cheese. Slide the pan under the broiler for about 5 minutes, keeping an eye on it, until the cheese is melted and turning brown in spots. Serve piping hot.
Note: After the 2 hours of low heat, it won’t hurt your onions to allow them to sit without heat for a couple of hours before moving on to evaporating the remaining water and caramelizing them.

Winter Greens Salad
I know, a salad doesn’t seem exciting, and not only is this a salad but it’s one made from winter greens that are maybe a little bit - what shall we say? - oh I guess, yes, they can be bitter, if you’re the type to judge. But don’t stop reading yet. It would be in your best interest to keep reading. Because yes, this salad has bitter greens in it, but the acidic lemony mustardy pop of the dressing transforms them. You will not regret eating this.
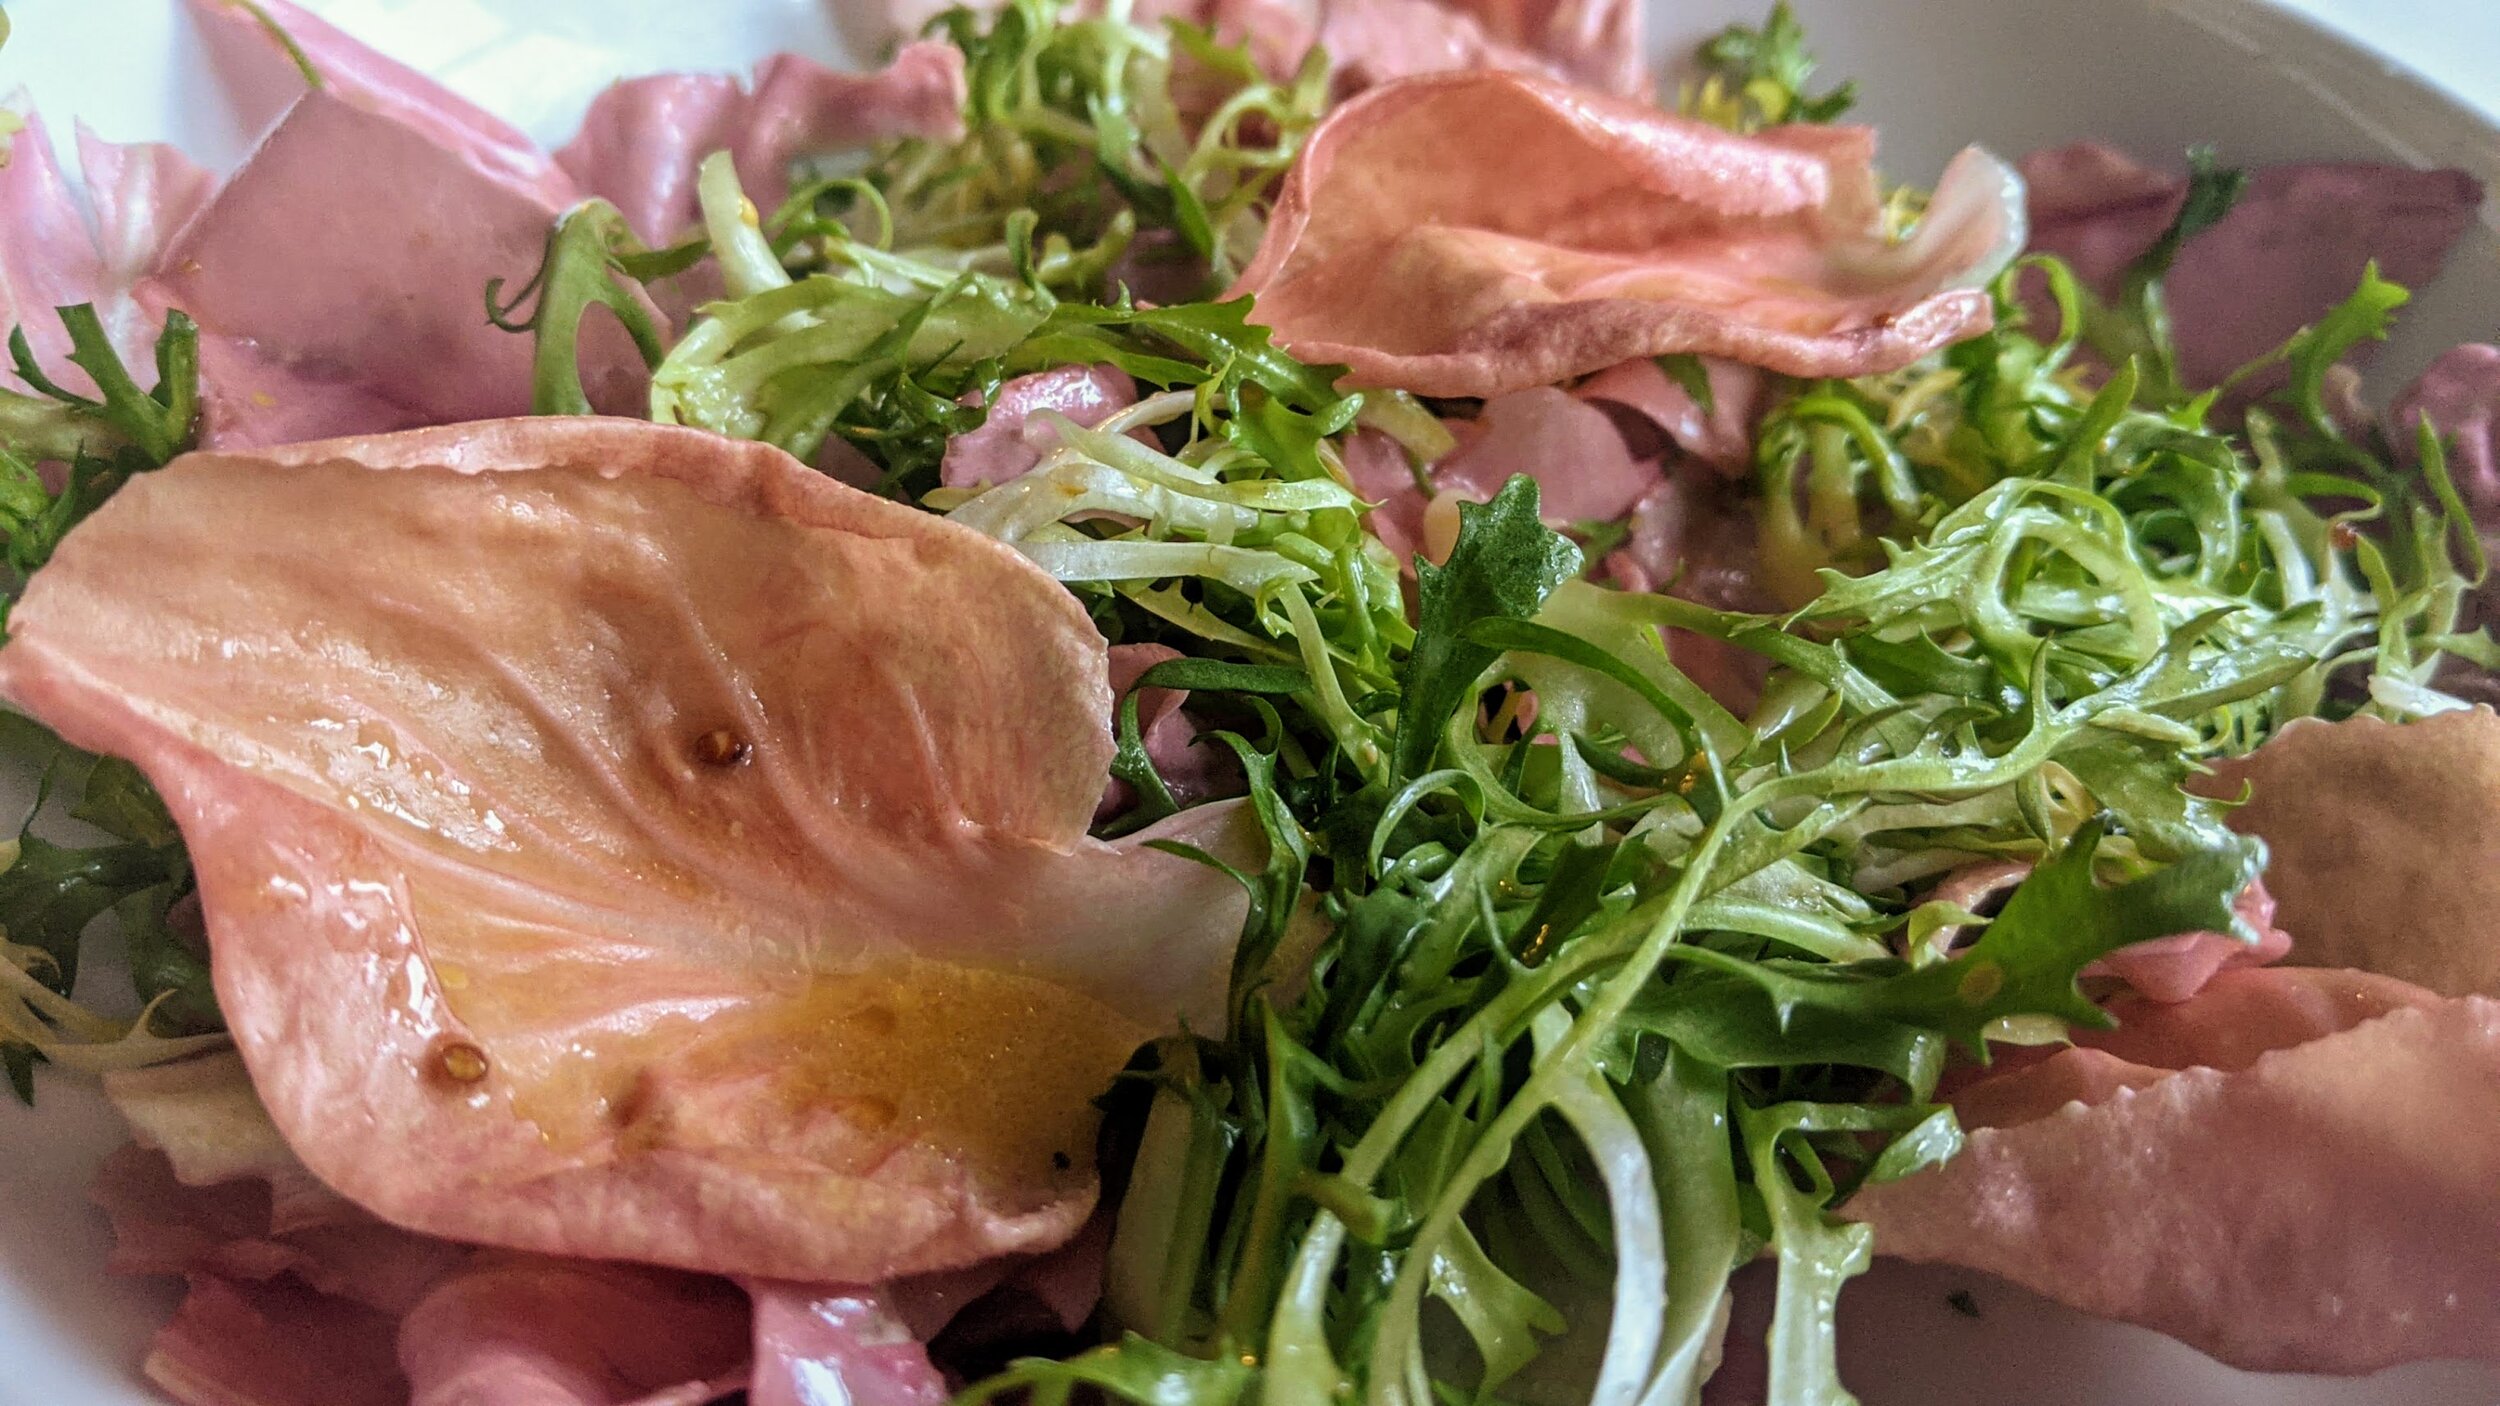
I know, a salad doesn’t seem exciting, and not only is this a salad but it’s one made from winter greens that are maybe a little bit - what shall we say? - oh I guess, yes, they can be bitter, if you’re the type to judge. But don’t stop reading yet. It would be in your best interest to keep reading. Because yes, this salad has bitter greens in it, but the acidic lemony mustardy pop of the dressing transforms them. You will not regret eating this.
And let’s face it - it’s been a loooong indoor winter, with sad salads made from greens that long for sun and soil and a shorter commute. These greens might be a little different from your darling bibb and butter lettuces, but they are of the moment. And aren’t we all a little bitter right now? These greens get you.


Did you notice that some of this salad is a little pink? That’s a fancy little chicory called Radicchio La Rosa del Veneto - aka pink radicchio from Venice. I’d never heard of it before, but my local shop had it and who could resist that color? Apparently it’s having a little moment and is being grown in the US with more regularity (some crazy restaurants actually import it from Venice!). It’s absolutely unnecessary to go on a mission to find it, though - red radicchio is equally delicious.

Eat this salad with these awesome garlic & goat cheese toasts, maybe some olives - and a big glass of wine.
Winter Greens Salad
Time: 10 minutes || Servings: 5 || Source: Slightly adapted from Mozza via NYT
Whole grain mustard - 1 ½ tsp
Dijon mustard - 1 ½ tsp
Lemon juice, freshly squeezed - 3 to 6 tbsp
Olive oil - ½ cup
Salt & pepper
Mixed winter greens, such as frisée, radicchio, or dandelion greens - 8 oz or ½ lb
When you’re ready to eat, wash and dry the greens. If there are signs of wilting, soak the greens in cold water - this can also help to reduce the bitterness of radicchio. Dry thoroughly using a salad spinner or kitchen towels. Tear greens into bite sized pieces. I like to keep small leaves whole because they’re pretty. Toss the greens together and place in a large bowl for serving, or individual bowls.
Make the dressing. Note: These amounts will make more dressing than you’ll need for this salad, but it’ll keep in the refrigerator for a week and works well on other greens. In a jar, combine the mustards, 3 tablespoons of lemon juice, and olive oil. Add salt and pepper to taste (I used ½ tsp salt to start). Cover and shake vigorously. When emulsified (the ingredients have come together and look creamy, and the olive oil isn’t separated), dip a small piece of radicchio or frisée into the dressing and taste it. The amount of lemon needed will depend on the acidity of your particular lemon and mustard; I needed 4 tablespoons to get some pop from the lemon. Add additional lemon and salt if needed and taste again - repeat until your palate is happy.
Toss the greens with just enough dressing to coat them. Start with less dressing than you think you need - it’s easy to add more, but an over-dressed salad is irretrievably soggy.
Variation: Although quite good as is, this salad wouldn’t suffer from the addition of toasted walnuts or pine nuts or a little shaved parmesan or roquefort if you feel so inclined.
Goat Cheese & Roasted Garlic Toasts
We’ve been enjoying a lot of rich, meaty foods recently (see: bolognese, beef stew), but with warmer weather peeking through - including an incredible 70°F March birthday, thank you thank you - it felt time to go for something a little lighter. We’re not quite at zucchini season, so I turned to winter greens and some pantry staples for support.

We’ve been enjoying a lot of rich, meaty foods recently (see: bolognese, beef stew), but with warmer weather peeking through - including an incredible 70°F March birthday, thank you thank you - it felt time to go for something a little lighter. We’re not quite at zucchini season, so I turned to winter greens and some pantry staples for support.
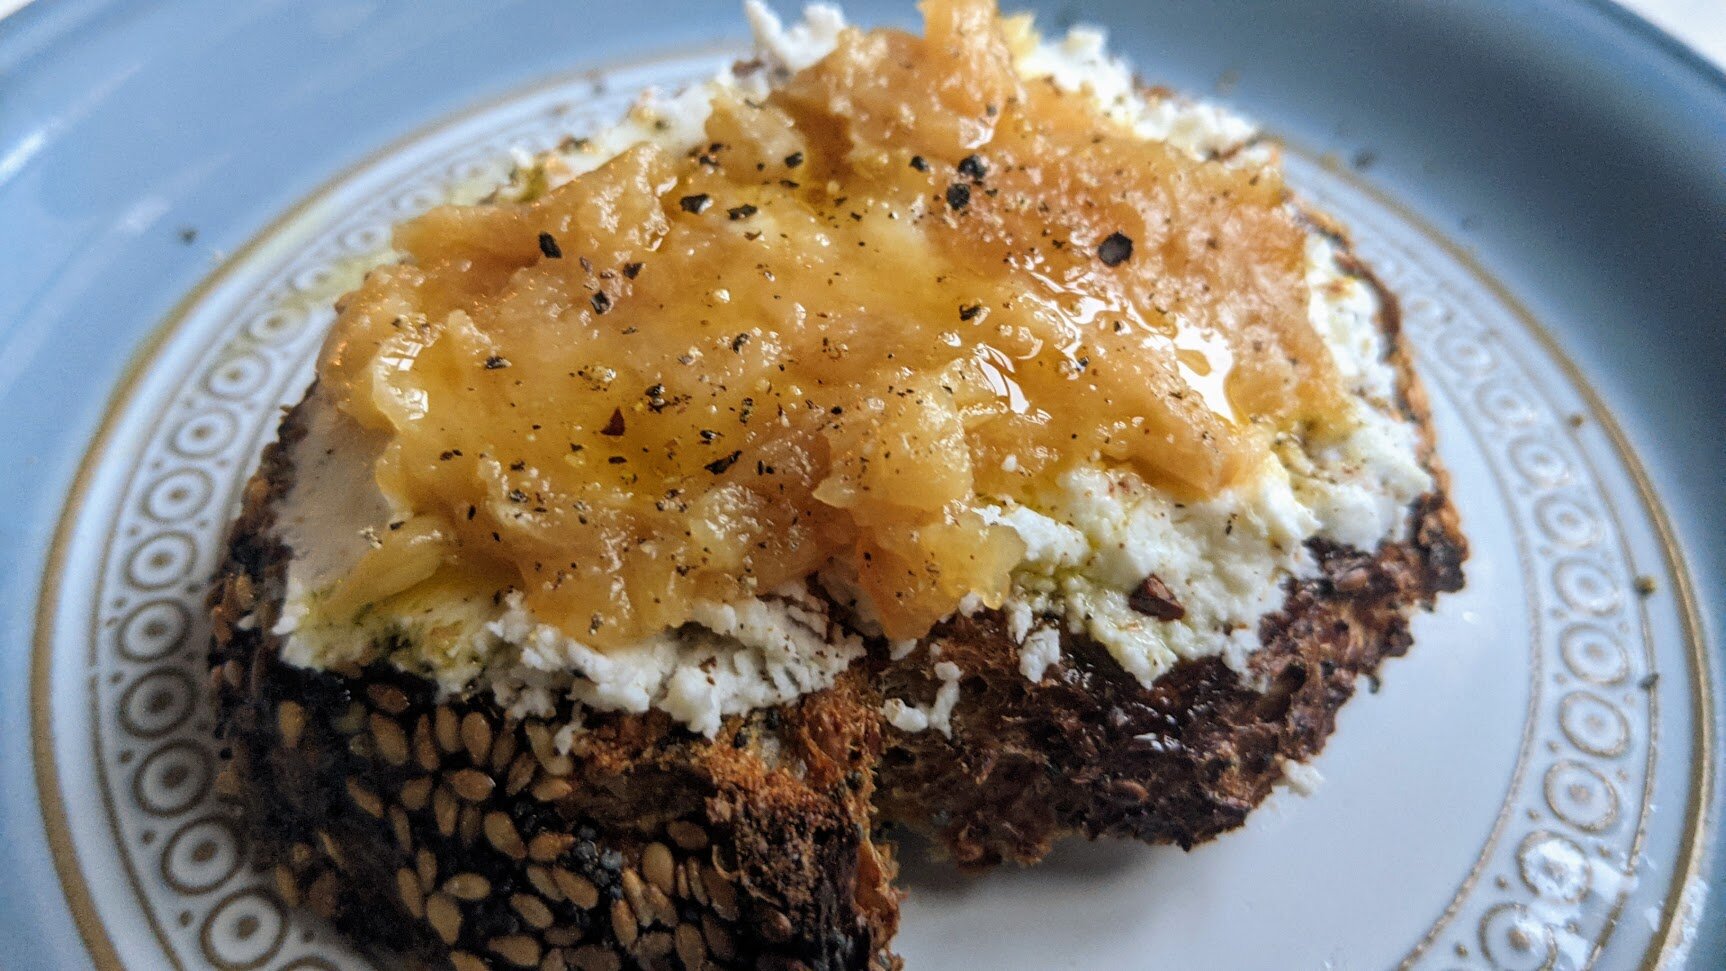
I love garlic. It has a distinct flavor, as vampires can attest, but it’s so versatile: crush a clove and plop it in a yogurt sauce for subtle flavor, grate it into a dressing for a spicy punch, mince it with onions as a base for tomato sauce. Or, in this case, mellow it out to sweetness with a long roast and eat it directly out of its crinkly skins.


This toast is super simple and easy to prep ahead of time - and actually, you eliminate most of the prep if you just arrange the ingredients for a make-it-yourself experience. The garlic heads can be roasted anytime the day you’re planning to eat, making it easy to snag five minutes to get them in the oven. I used a seeded sourdough for this, but most toasted bread would work - I like having them be sort of crostini sized for easy assembly and consuming.


This is great for lunch with a salad, or bulk it out for dinner with more antipasti items, like raw or roasted vegetables, cured meats, olives, and, of course, wine.
Goat Cheese & Roasted Garlic Toasts
Time: 15 minutes active, 1 hour roasting || Servings: your call
Garlic heads - 1 per person
Olive oil
Goat cheese - 1-2 oz per person
Good bread, such as a baguette
Herbs, such as thyme or rosemary - optional
Salt & pepper
Roast the garlic. This can be done anytime the day you’re planning to eat. Heat the oven to 400°F. Slice about a half inch off the top of the garlic heads - the top of the garlic cloves should be visible. If not, slice a little more. Discard the tops. Place the garlic heads in a baking dish, cut side up. Drizzle the top lightly with olive oil and sprinkle with salt. Fill the baking dish about a quarter inch deep with water and cover tightly with foil. Roast in the oven for 45 minutes to 1 hour. When done, remove from the oven and remove the foil; the garlic should be soft and creamy. The garlic can sit at room temperature in its papery skin until you’re ready to use it.
When you’re closer to eating, put the goat cheese out to come to room temperature - this makes it easier to spread. Finely chop the herbs, if using, and combine with the goat cheese.
Cut the bread into pieces that are easy to pick up - slices for a baguette, or 1.5 inch squares for a boule. Toast the bread lightly.
You can assemble the toasts to serve, but I like putting all of the components out to let people assemble their own. This is how I assemble mine: I spread the goat cheese over the toast, then gently squeeze the bottom of the garlic cloves - they should squish right out. I spread the garlic over the goat cheese, then drizzle it with olive oil and sprinkle with chunky salt and a few grinds of black pepper.

Omelettes
Folks, we’ve had a breakthrough. My amazing, darling, spectacular daughter slept through the night last night. After months of groggy, delirious mornings with conversation limited to grunts, it was like the sun peeked through the clouds. There’s an end in sight! In a 2020 that’s been dark in so many ways, this small but critical change was quite possibly the best thing that’s happened to my family in months. Breakfast for us has been recently restricted to whatever is quick, straightforward, and goes with coffee — generally the realm of yogurt, oatmeal, and bagels. But I was in such a good mood this morning that I decided to go big for breakfast: omelettes.

Folks, we’ve had a breakthrough. My amazing, darling, spectacular daughter slept through the night last night. After months of groggy, delirious mornings with conversation limited to grunts, it was like the sun peeked through the clouds. There’s an end in sight! In a 2020 that’s been dark in so many ways, this small but critical change was quite possibly the best thing that’s happened to my family in months. Lately, breakfast for us has been restricted to whatever is quick, straightforward, and goes well washed down with a gallon of coffee — generally the realm of yogurt, oatmeal, and bagels. But I was in such a good mood this morning that I decided to go big for breakfast: omelettes.


There was a time several months ago when I made omelettes almost daily for breakfast or lunch. I was on a mission to perfect my omelette-making technique, which isn’t that difficult but definitely takes some experience to know when the eggs are looking right. I’d greedily store up the odds and ends from dinner - onion ends, the tiny bit of scallion that didn’t get used, pepper scraps - for the omelette filling.
I remember reading somewhere (Julia Child, queen of omelettes, comes to mind as a possible source) that the best way to learn to make an omelette is to have someone show you how. I use maybe a less than perfect technique, especially if you compare it to Julia’s, but it works for me, and there’s never much left on the plate after a meal. That seems like success to me.


I generally use two eggs per omelette, which is typically enough with fillings and some toast. To do this right, you need a decent non-stick pan. Mine is 10 inches, so my omelettes come out a little thinner and more delicate than they would in a more typical 8 or 9 inch pan, but I like them that way. The only other tool you need is a rubber spatula so that you don’t harm your pan and so you can easily slide under the omelette to lift it. And butter.
Once you get the hang of it, omelettes are a pretty quick breakfast, lunch, or dinner. But they feel kind of special compared to cereal, and your fellow diners will definitely be impressed by your kitchen skills.

Despite my full night of sleep (bliss), I went lazy - a.k.a. no-cook - on the filling. Goat cheese and chives is classic, delicious, and easy - but use whatever you have hanging around. Ready?
Omelettes
Servings: 1 || Time: 10 mins || Inspiration: A full night of sleep
Butter - 1 tbsp
Eggs - 2, whisked until just combined
Salt & pepper
Filling of your choice - in this case, 1 tbsp goat cheese and chives
Prepare your filling - in this case, get out your goat cheese and chives. Take a sip of coffee or beverage of choice (no judgement).
Heat butter in 8, 9, or 10 inch non-stick pan over medium heat until it foams.
Get your spatula ready, and pour eggs into the pan. Turn heat to low. Immediately stir eggs in a steady figure-8 pattern until they begin to set, about two minutes. You may need to push the sides down to avoid crispy thin egg edges. Once egg begins to set, stop stirring the eggs - if you keep going, you’ll have delicious scrambled eggs, but not an omelette.
Continue cooking eggs over low until the top is somewhat moist but no longer wet - the eggs shouldn’t run when you tilt the pan. (If they do, lift the edge of the omelette and tilt the pan to allow the wet egg on top to slide under the cooked egg.) Turn off the heat.
Slide a spatula under the omelette to ensure it’s loose from the pan. Season with salt and pepper.
About a third of the way into the egg disc, perpendicular to the pan handle, create a line of filling. Lay down the goat cheese, and then snip chives over the top. With a nonstick spatula, tip the edge of the eggs closest to the handle over the filling. Roll one more time, until you have a little omelette roll with a lip.
Tilt pan over a plate and, using your spatula, roll omelette a final time off the pan and onto the plate. Top lightly with butter (for shine, if you want to get fancy) and season with salt and pepper.

Chinese-Style Rice Noodles
My best friend since childhood, Cat, is Chinese. We had sleepovers weekly, attended our first concert together, went to dance classes together (…when my mom didn’t take us for ice cream instead - the antithesis of Cat’s strict Chinese parents). We grew up in each other’s homes during our formative years.
My best friend since childhood, Cat, is Chinese. We had sleepovers weekly, attended our first concert together, went to dance classes together (…when my mom didn’t take us for ice cream instead - the antithesis of Cat’s strict Chinese parents). We grew up in each other’s homes during our formative years.
My family introduced Cat to American, Middle Eastern, and European cuisines. She had her first hamburger at my house and most of the candy she consumed from elementary school through junior high. In an almost certainly overblown-in-the-retelling near drowning incident at a water park, my mom frantically yelled, “That’s my daughter!!!” at a confused lifeguard. (Interracial adoption was less prevalent in NH in the ‘90s, no doubt.)
On the reverse side, I spent a ton of time at Cat’s house. Hanging out with Cat included watching her practice piano, attending Chinese school as the awkward Caucasian tag-along, and going apple picking with her extended family. Her family still loves telling stories about the first time I used chopsticks (it didn’t go well), my reaction to chicken feet (it didn’t go well), and how I worked the room with all the non-English speaking relatives (it went really well, they loved me).


I had no idea how lucky I was to be exposed to Cat’s mother’s amazing culinary skills over the years. Even now, I remember what their home smelled like, the rice always in the pot, the balls of herbal medicine. All those years, and I have maybe three poorly pronounced words of Chinese and no recipes or instincts for Chinese food. For better or worse, all I have to go on now is Cat.
While I can’t really say whether this is authentically Chinese (I was ten, I wasn’t paying attention!), this noodle dish is based off of Cat’s “recipe” when she made it for me a couple of years ago. Measurements weren’t really involved, and she thought it was silly that I was even asking - “just taste it, does it taste good?” - so let’s just say this is a rough reimagining of what she did.


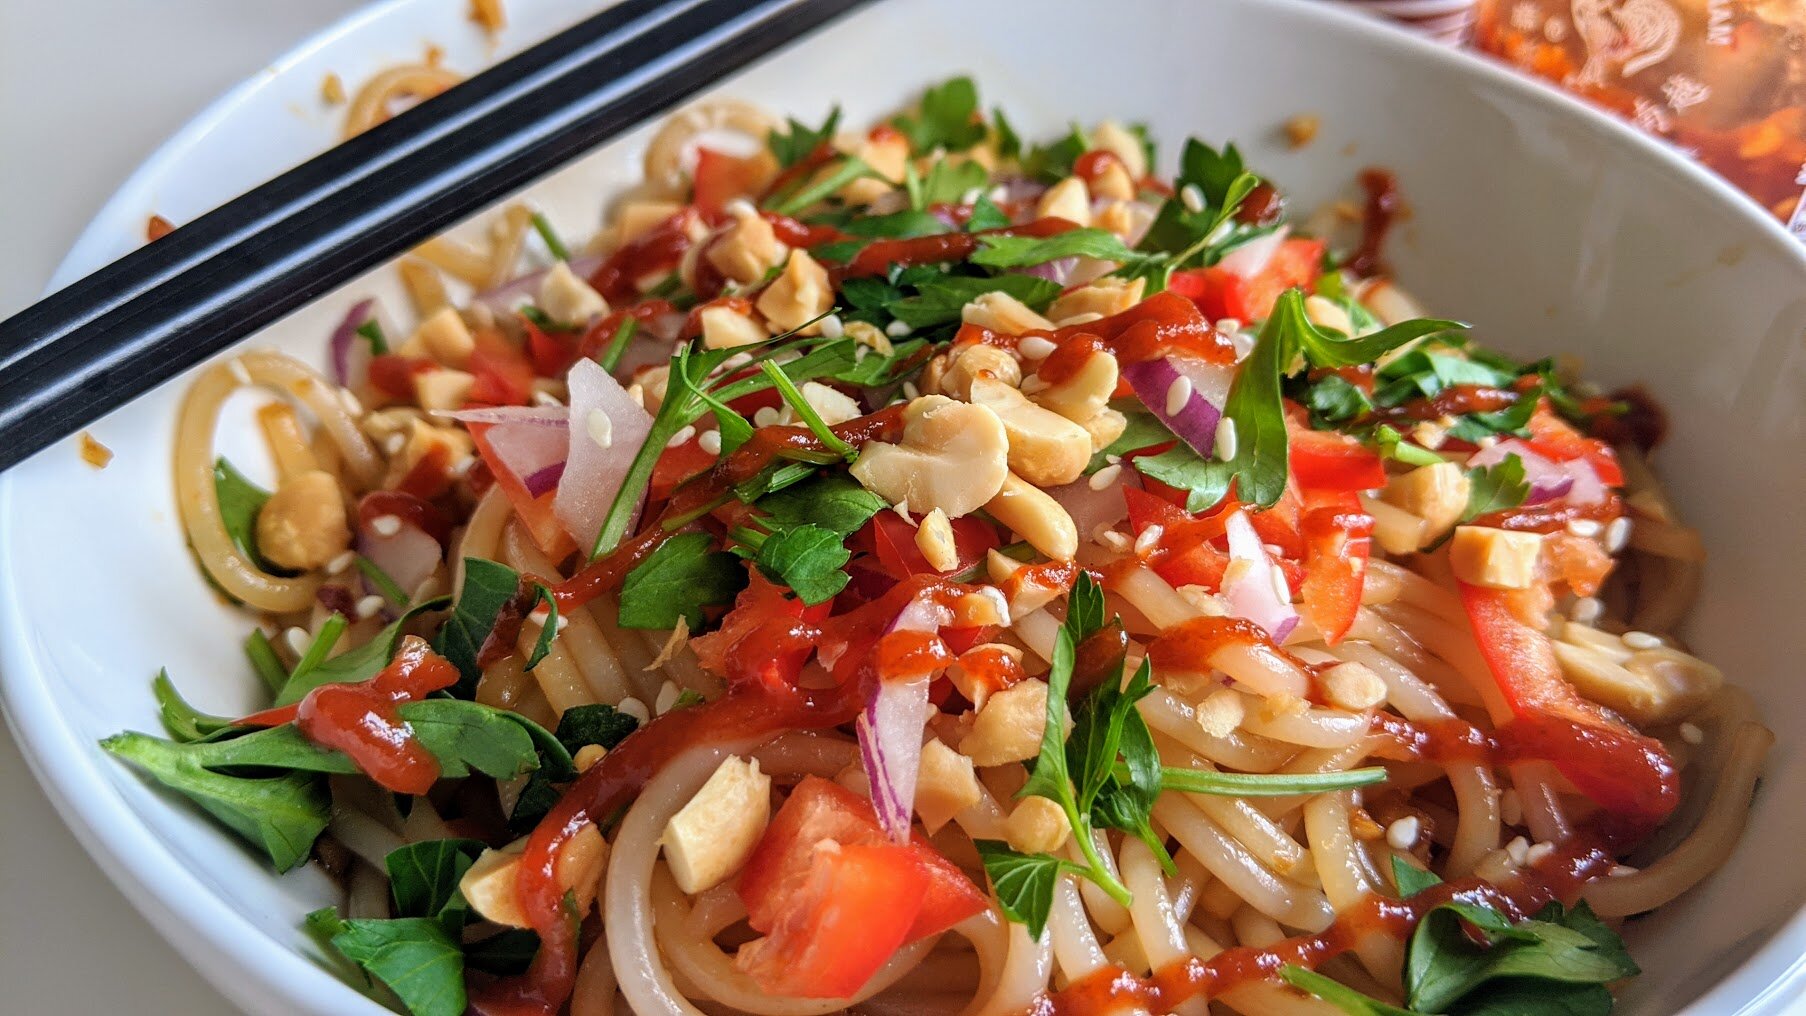
This has been a go-to recipe in my household for a quick and easy, mostly healthy, warm lunch. This is a very basic version of it, but it’s easily adapted to include vegetables (wilted greens, raw radishes, hot peppers) and meat or seafood. In what’s developing as a bit of a theme on this blog, I find this to be yet another good recipe for using up odds and ends in the kitchen.
Chinese-Style Rice Noodles
Yield: 2 servings || Time: 20 minutes || Source: Cat
Rice noodles - 4 oz
Ginger - 2 inches, grated or minced
Garlic - 1 clove, grated or minced
Soy sauce - 1/3 cup
Rice wine vinegar - 1 tbsp
Sesame oil - 1 tbsp
Chili garlic sauce - 1 tbsp or to taste (if you don’t have this, add some red pepper flakes to taste)
Red onion - 1/4 cup, chopped
Red pepper - 1/3 cup, chopped
Cilantro - 2 tbsp, chopped
Peanuts - 2 tbsp, chopped
Sesame seeds, for garnish
Sriracha or other hot sauce, for serving
Set a large pot of water to boil. When it’s boiling, cook noodles according to package directions. This usually takes 30 seconds if they’re fresh noodles and maybe 3 minutes if they’re dry.
In a small bowl, combine ginger, garlic, soy sauce, rice wine vinegar, sesame oil, and chili garlic sauce or red pepper flakes. Taste - it should be salty from the soy sauce and a little vinegary. Adjust to taste, but remember it’ll be absorbed by starchy noodles so it won’t taste as strongly when everything is combined.
When noodles are ready, drain and pour them into bowls. Divide sauce among bowls and toss the noodles. Top with chopped onion, red pepper, cilantro, and peanuts. Garnish with sesame seeds and serve with Sriracha.