
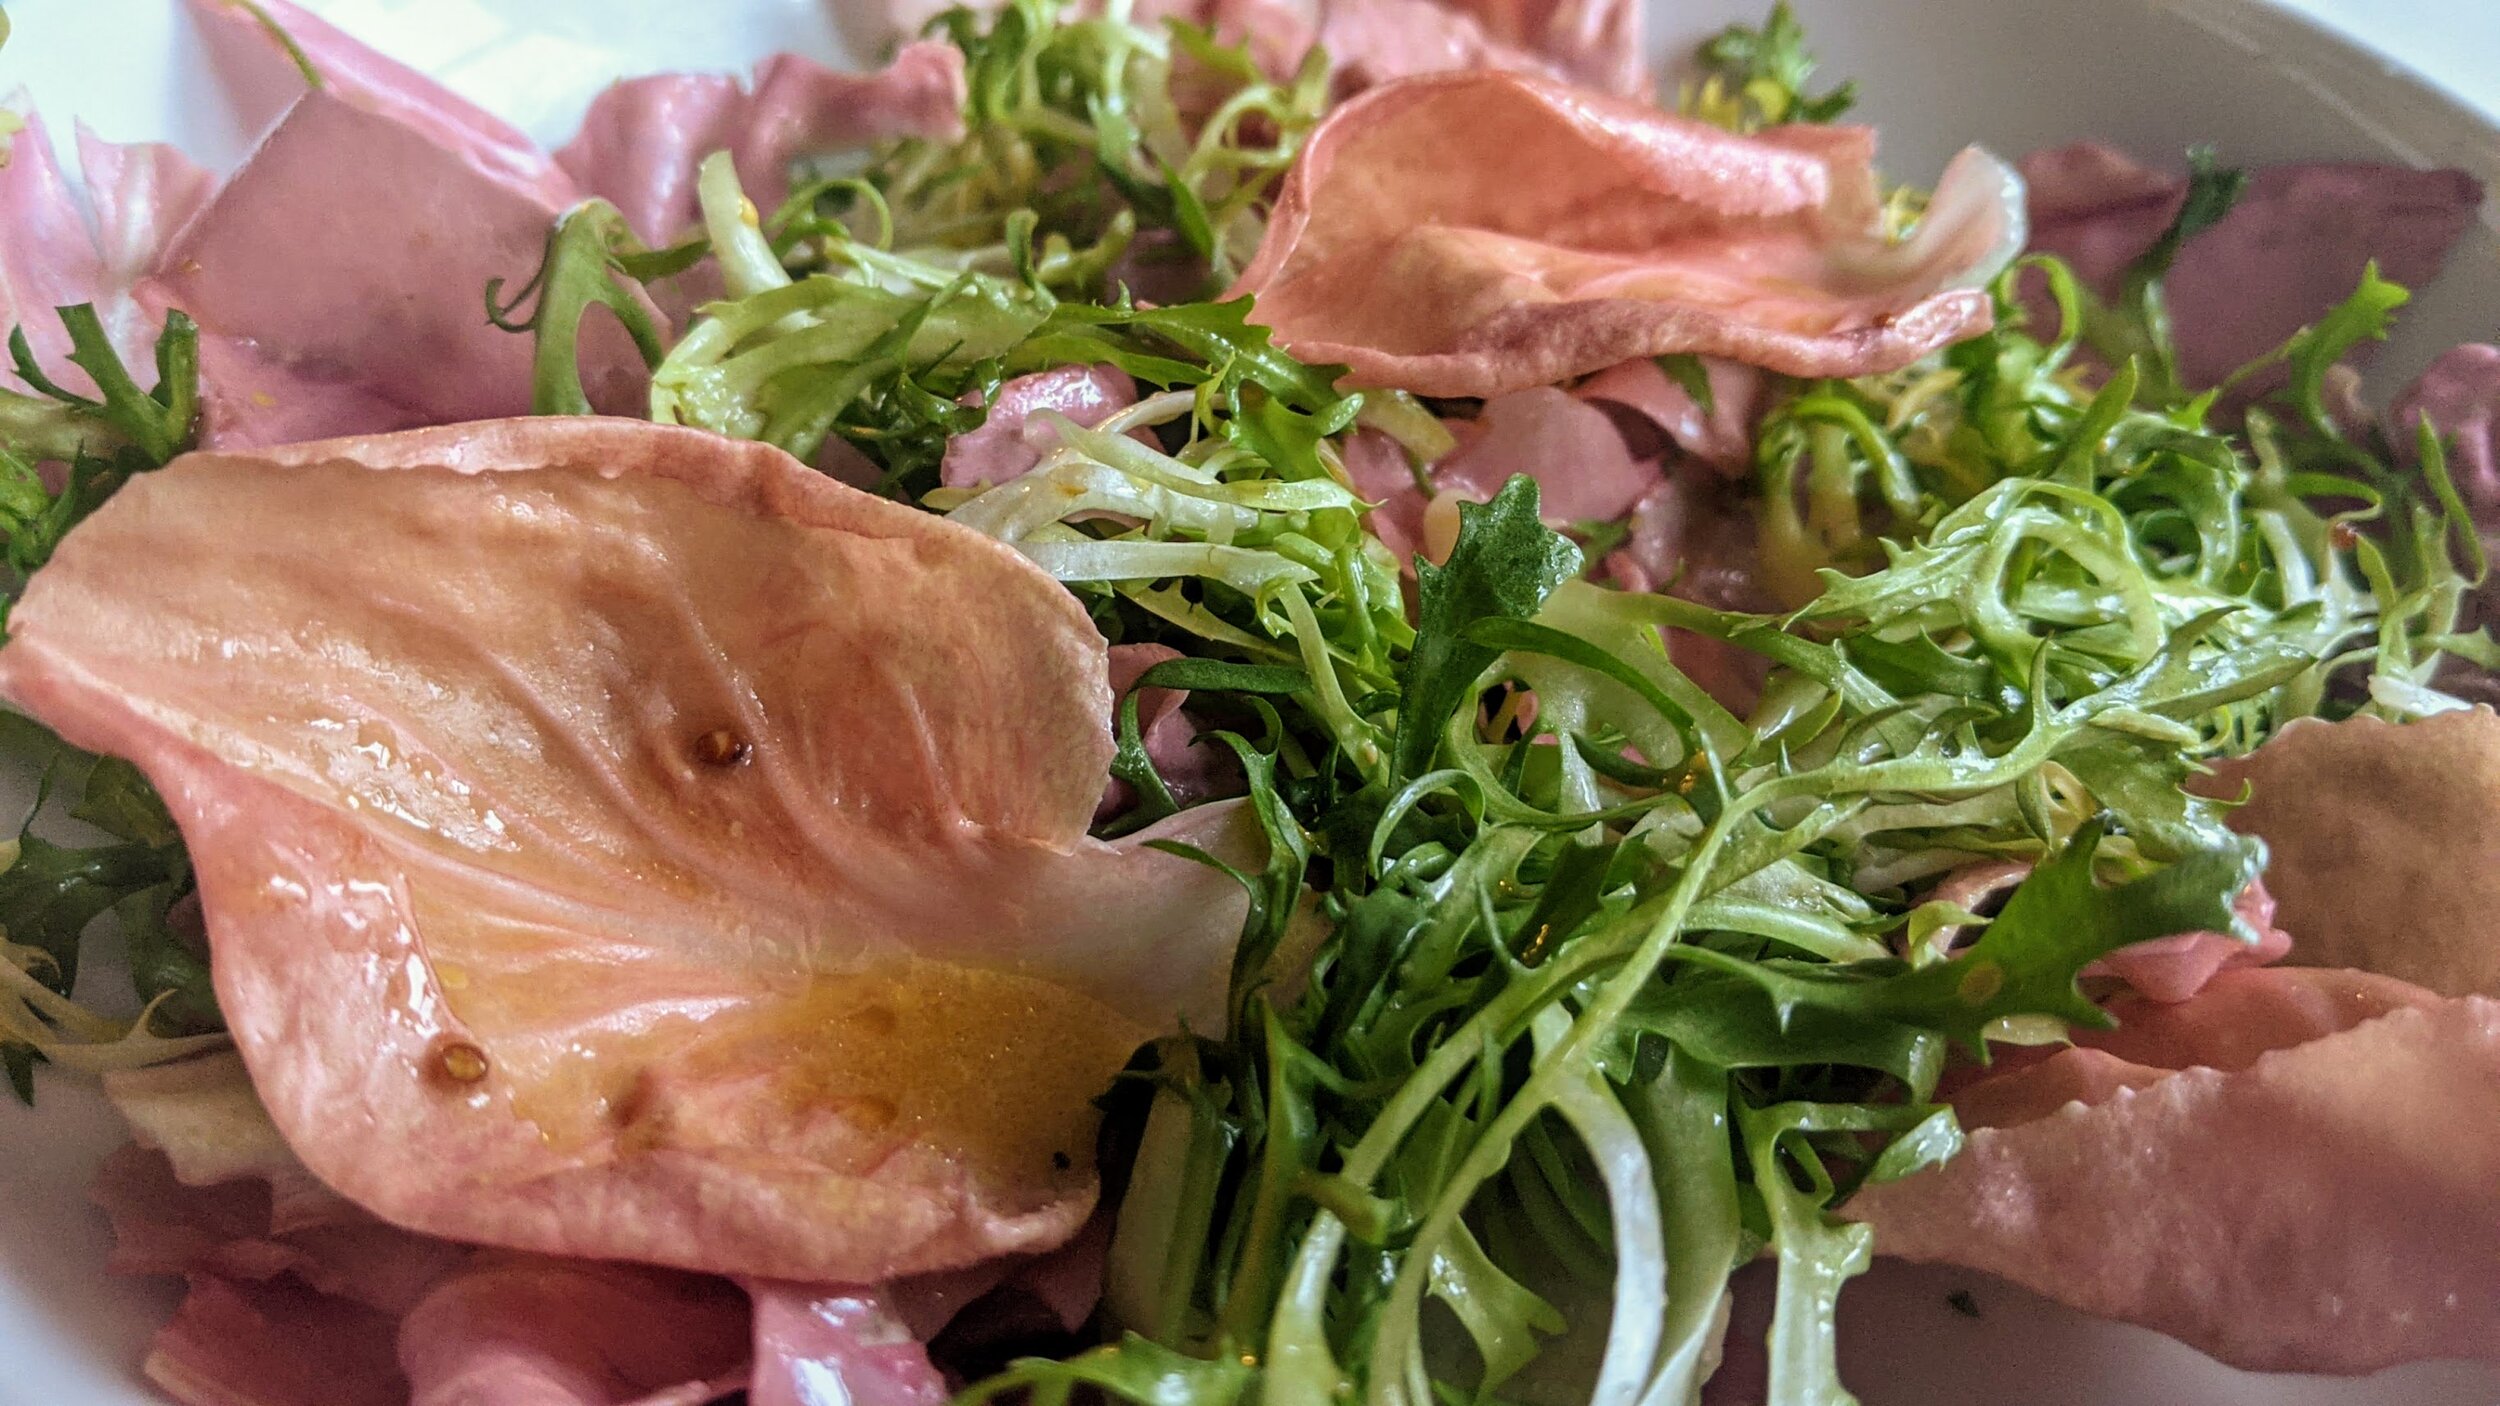
Winter Greens Salad
I know, a salad doesn’t seem exciting, and not only is this a salad but it’s one made from winter greens that are maybe a little bit - what shall we say? - oh I guess, yes, they can be bitter, if you’re the type to judge. But don’t stop reading yet. It would be in your best interest to keep reading. Because yes, this salad has bitter greens in it, but the acidic lemony mustardy pop of the dressing transforms them. You will not regret eating this.
I know, a salad doesn’t seem exciting, and not only is this a salad but it’s one made from winter greens that are maybe a little bit - what shall we say? - oh I guess, yes, they can be bitter, if you’re the type to judge. But don’t stop reading yet. It would be in your best interest to keep reading. Because yes, this salad has bitter greens in it, but the acidic lemony mustardy pop of the dressing transforms them. You will not regret eating this.
And let’s face it - it’s been a loooong indoor winter, with sad salads made from greens that long for sun and soil and a shorter commute. These greens might be a little different from your darling bibb and butter lettuces, but they are of the moment. And aren’t we all a little bitter right now? These greens get you.


Did you notice that some of this salad is a little pink? That’s a fancy little chicory called Radicchio La Rosa del Veneto - aka pink radicchio from Venice. I’d never heard of it before, but my local shop had it and who could resist that color? Apparently it’s having a little moment and is being grown in the US with more regularity (some crazy restaurants actually import it from Venice!). It’s absolutely unnecessary to go on a mission to find it, though - red radicchio is equally delicious.

Eat this salad with these awesome garlic & goat cheese toasts, maybe some olives - and a big glass of wine.
Winter Greens Salad
Time: 10 minutes || Servings: 5 || Source: Slightly adapted from Mozza via NYT
Whole grain mustard - 1 ½ tsp
Dijon mustard - 1 ½ tsp
Lemon juice, freshly squeezed - 3 to 6 tbsp
Olive oil - ½ cup
Salt & pepper
Mixed winter greens, such as frisée, radicchio, or dandelion greens - 8 oz or ½ lb
When you’re ready to eat, wash and dry the greens. If there are signs of wilting, soak the greens in cold water - this can also help to reduce the bitterness of radicchio. Dry thoroughly using a salad spinner or kitchen towels. Tear greens into bite sized pieces. I like to keep small leaves whole because they’re pretty. Toss the greens together and place in a large bowl for serving, or individual bowls.
Make the dressing. Note: These amounts will make more dressing than you’ll need for this salad, but it’ll keep in the refrigerator for a week and works well on other greens. In a jar, combine the mustards, 3 tablespoons of lemon juice, and olive oil. Add salt and pepper to taste (I used ½ tsp salt to start). Cover and shake vigorously. When emulsified (the ingredients have come together and look creamy, and the olive oil isn’t separated), dip a small piece of radicchio or frisée into the dressing and taste it. The amount of lemon needed will depend on the acidity of your particular lemon and mustard; I needed 4 tablespoons to get some pop from the lemon. Add additional lemon and salt if needed and taste again - repeat until your palate is happy.
Toss the greens with just enough dressing to coat them. Start with less dressing than you think you need - it’s easy to add more, but an over-dressed salad is irretrievably soggy.
Variation: Although quite good as is, this salad wouldn’t suffer from the addition of toasted walnuts or pine nuts or a little shaved parmesan or roquefort if you feel so inclined.
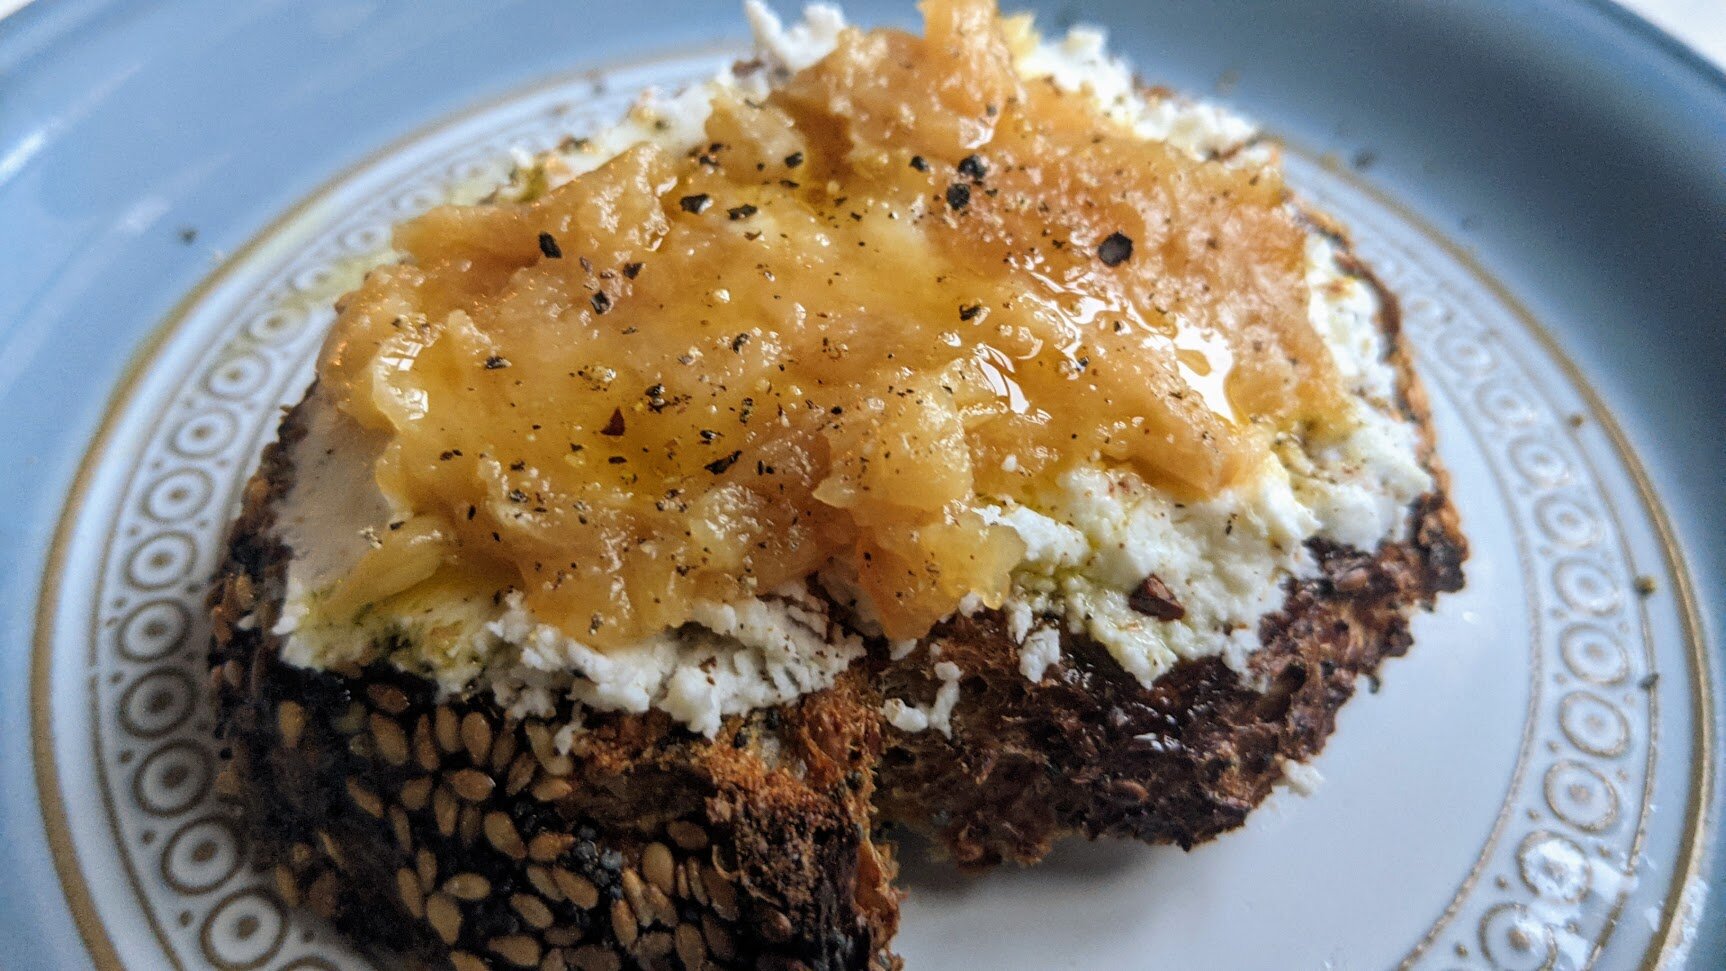
Goat Cheese & Roasted Garlic Toasts
We’ve been enjoying a lot of rich, meaty foods recently (see: bolognese, beef stew), but with warmer weather peeking through - including an incredible 70°F March birthday, thank you thank you - it felt time to go for something a little lighter. We’re not quite at zucchini season, so I turned to winter greens and some pantry staples for support.

We’ve been enjoying a lot of rich, meaty foods recently (see: bolognese, beef stew), but with warmer weather peeking through - including an incredible 70°F March birthday, thank you thank you - it felt time to go for something a little lighter. We’re not quite at zucchini season, so I turned to winter greens and some pantry staples for support.
I love garlic. It has a distinct flavor, as vampires can attest, but it’s so versatile: crush a clove and plop it in a yogurt sauce for subtle flavor, grate it into a dressing for a spicy punch, mince it with onions as a base for tomato sauce. Or, in this case, mellow it out to sweetness with a long roast and eat it directly out of its crinkly skins.


This toast is super simple and easy to prep ahead of time - and actually, you eliminate most of the prep if you just arrange the ingredients for a make-it-yourself experience. The garlic heads can be roasted anytime the day you’re planning to eat, making it easy to snag five minutes to get them in the oven. I used a seeded sourdough for this, but most toasted bread would work - I like having them be sort of crostini sized for easy assembly and consuming.


This is great for lunch with a salad, or bulk it out for dinner with more antipasti items, like raw or roasted vegetables, cured meats, olives, and, of course, wine.
Goat Cheese & Roasted Garlic Toasts
Time: 15 minutes active, 1 hour roasting || Servings: your call
Garlic heads - 1 per person
Olive oil
Goat cheese - 1-2 oz per person
Good bread, such as a baguette
Herbs, such as thyme or rosemary - optional
Salt & pepper
Roast the garlic. This can be done anytime the day you’re planning to eat. Heat the oven to 400°F. Slice about a half inch off the top of the garlic heads - the top of the garlic cloves should be visible. If not, slice a little more. Discard the tops. Place the garlic heads in a baking dish, cut side up. Drizzle the top lightly with olive oil and sprinkle with salt. Fill the baking dish about a quarter inch deep with water and cover tightly with foil. Roast in the oven for 45 minutes to 1 hour. When done, remove from the oven and remove the foil; the garlic should be soft and creamy. The garlic can sit at room temperature in its papery skin until you’re ready to use it.
When you’re closer to eating, put the goat cheese out to come to room temperature - this makes it easier to spread. Finely chop the herbs, if using, and combine with the goat cheese.
Cut the bread into pieces that are easy to pick up - slices for a baguette, or 1.5 inch squares for a boule. Toast the bread lightly.
You can assemble the toasts to serve, but I like putting all of the components out to let people assemble their own. This is how I assemble mine: I spread the goat cheese over the toast, then gently squeeze the bottom of the garlic cloves - they should squish right out. I spread the garlic over the goat cheese, then drizzle it with olive oil and sprinkle with chunky salt and a few grinds of black pepper.

White Bean Bruschetta
I am excited to start with a simple dish that we love from a sadly defunct but formerly lovely West Village restaurant, Pó. Pó was one of Mario Batali’s first restaurants and it was (in typical NYC style) a tiny, cozy spot that put out delicious Italian food. Amazingly, one of the best things they served was actually free.

Hello -- my name’s Marisa, I live in NYC with my partner and our new-ish baby girl (born in December!). I’m starting this blog to document our adventures in cooking and eating, two of my very favorite activities.

It’s been challenging to get back into cooking following the birth of our little one, but I’ve always found cooking to be a rewarding (read: delicious) and mostly relaxing activity. I also really believe in being close to your food - knowing where it comes from and the people who grow it, if you can. That’s easier to do when it’s not winter, of course.


I’m excited to start with a simple dish that we love from a sadly defunct but formerly lovely West Village restaurant, Pó. Pó was one of Mario Batali’s first restaurants — despite his other proclivities, he does know how to cook. In typical NYC style, it was a tiny, cozy spot that put out delicious Italian food. Delightfully, one of the best things they served was actually free.
This white bean bruschetta, studded with zingy sliced garlic and red pepper flakes, came to the table gratis. It was a mouth-watering way to start a meal and, as it turns out, not too difficult to make at home. I really like that it’s versatile -- simple enough for an any-night appetizer using mostly pantry items, impressive enough for guests, and easily scaled for a big group. This will be tasty no matter what, but I like to splurge on fresh, good quality olive oil and aged balsamic to make this extra.

White Bean Bruschetta from Pó (RIP)
Yield: 12 pieces || Time: 20 minutes || Source: Pó
Cannellini beans (white kidney beans) - 1 can, drained & well rinsed
Extra virgin olive oil - 3 tablespoons
Balsamic vinegar - 2 tablespoons
Red pepper flakes - 1/2 teaspoon or to taste
Basil leaves - 2 tablespoons, chopped*
Garlic - 2 cloves, thinly sliced or finely chopped
Salt and pepper
Baguette, sliced ½” thick
In a medium bowl, put the rinsed beans, olive oil, balsamic vinegar, red pepper flakes, basil, and garlic. Gently combine - I like to use my hands. Season with salt and pepper to taste. Let it sit in the refrigerator for a few hours to marinate and let the flavors come together.
Slice the baguette. Serve the bread with the bowl of the bean mixture, or spoon the bean mixture on ahead of time if you want to get fancy. If you do put the beans on the bread to serve, consider toasting the bread so it doesn’t get soggy (in an oven at 325°F for 5-10 minutes).
—————————-
*Although it makes no difference to how it tastes, basil is beautiful when it’s thinly sliced, aka chiffonade. To do it, pile a number of basil leaves on top of each other, then tightly roll the pile so you have a long thin roll. Slice thinly along the bundle of basil and you’ll get elegant ribbons!